인코딩과 디코딩

old/Mobile 2010. 5. 10. 16:01

보통의 텍스트 파일을 보내고 받는데는 위와 같이 ASCII 라는 공통된 표준에 따르기만 하면 아무 문제가 없었다. 그런데 네트웍을 통해 ASCII 파일이 아닌, 즉 바이너리 파일을 보낼 필요가 자주 발생하게 되었다.


바이너리 파일이라 함은 음악 파일이나 그래픽 파일, 무비 파일, 또는 워드프로세서로 만든 (포매팅 정보가 담긴) 문서 파일등을 의미한다. 이들은 모두 8 자리 이진수의 첫번째 자리가 '0'으로 한정된 것이 아닌, 8 비트 모두를 다 사용한다는 특징을 있다. 즉 8 비트 데이터이다. (아스키문자-->7비트 데이터)


그런데, 이메일이나 기타 네트웍상에 데이터를 교환하는 시스템은 애초 아스키 문자로 이뤄진 파일만을 전송하는 것을 전제로 제작되었기 때문에 첫번째 숫자가 1인 이들 바이너리 데이터를 제대로 전달할 수가 없었다.


따라서 이들 바이너리 파일(음악, 그래픽, 무비, 엑셀파일) 등을 기존의 시스템 상에서 문제없이 전달하기 위해서는 이들을 '아스키 문자 파일' 로 전달해야 했다. 즉. '텍스트' 형태로 변환해야만 했다. 이러한 작업을 일컬어 인코딩 (encoding) 이라고 한다.


디코딩은 당연히 인코딩된 텍스트 파일을 다시 바이너리 파일로 변환하는 해독과정을 의미한다. 그러면 초창기에 인코딩을 어떻게 했는지 초기 인코딩 방식의 대표적 표준인 UUEncode (Unix-to-Unix Encode) 방식의 원리를 통해 간단히 알아보자.


바이너리 파일에서 3 개의 바이트를 불러내 보면.
10011100, 00110011, 11110000


이러면 2진수 8자리씩 총 24개가 된다. 이들을 다시 6개짜리 4개로 재구성한다.
100111, 000011, 001111, 110000

그 다음 첫 두자리에 0을 붙입니다.
00100111, 00000011, 00001111, 00110000


이제 전부 첫번째 숫자가 0 이 되어서 조금 더 아스키코드와 유사한 형태로 재구성되었다. 그 다음엔 각각에 십진수 32 (이진수 100000)를 더한다. 왜? 그렇게 하면 조절문자가 아닌, '화면에 보이는' 보통의 문자값이 되기 때문이다.


그 결과는 아래와 같다.
01100111, 01000011, 01001111, 01110000


이제 이들은 모두 알파벳이나 기타 기호등의 보통의 아스키 문자로 바꿀 수가 있다. 따라서 이런 과정을 거친 파일은 하나의 '아스키문자 파일' 이 되어서, 종래의 이메일 시스템 등을 통해 아무 문제없이 전달될 수가 있다.

'old > Mobile' 카테고리의 다른 글

Vcard 타입과 Vcalendar 타입  (0) 2010.05.10
OSI 7계층 개념잡기  (0) 2010.05.10
Ad-Hoc 이란?  (0) 2010.05.10
MIME 개념잡기  (0) 2010.05.10
아스키(Ascii)와 바이너리(Binary) 개념잡기  (0) 2010.05.10
Posted by jazzlife
,

Ad-Hoc 이란?

old/Mobile 2010. 5. 10. 16:00

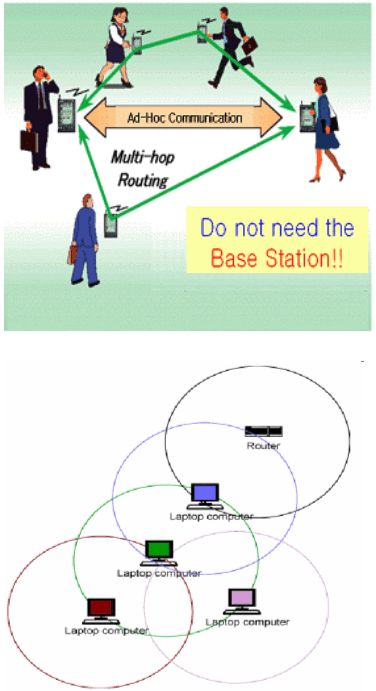
Ad-Hoc 네트워크라 함은 무선 통신 및 네트워킹 능력을 갖춘 두개 이상의 장비로 구성된 네트워크를 말한다. Ad-Hoc 네트워크를 구성하는 노드들은 같은 네트워크를 구성하는 자신의 전파 도달거리 밖에 있는 다른 노드와 통신할 수 있으며, 이때 중간 노드(intermediate node)들은 소스와 목적지 노드간의 데이터 통신을 위한 패킷을 전달(forwarding), 중계(relay)할 수 있는 기능을 제공한다.


Ad-Hoc 네트워크의 가장 큰 특징은 “ad-hoc" 자체가 의미하듯이 별도의 기반 시설(infrastructure)없이 모바일 디바이스만으로 구성가능하며(self-organizing), 네트워크의 어떠한 변화에도 적응적(adaptive)이라는 것이다.


즉 네트워크를 구성하는 노드들만으로 별도의 시스템 관리(system administration)없이 네트워크 상의 다른 노드들을 발견하고 네트워크를 형성할 수 있음을 의미한다. 또한 기존의 네트워크와 같이 별도의 베이스 스테이션(base station), 와이어 또는 케이블, 라우터나 브리지 등 네트워크를 구성하기 위한 기반시설 없이 네트워크 구성이 가능하다.


또 다른 특징으로 서로 다른 종류의 디바이스로도 네트워크의 형성이 가능하다는 특징이 있다. 즉 하나의 동일한 Ad-Hoc 통신 프로토콜을 사용함으로써 노트북이나 PDA, 또는 인터넷 모바일 휴대폰 등 이기종간에 통신이 가능한 Ad-Hoc 네트워크를 구성할 수 있다.


(그림) Ad-hoc 서비스

'old > Mobile' 카테고리의 다른 글

OSI 7계층 개념잡기  (0) 2010.05.10
인코딩과 디코딩  (0) 2010.05.10
MIME 개념잡기  (0) 2010.05.10
아스키(Ascii)와 바이너리(Binary) 개념잡기  (0) 2010.05.10
음수 2진수와 10진수간의 변환 방법  (0) 2010.05.10
Posted by jazzlife
,

MIME 개념잡기

old/Mobile 2010. 5. 10. 16:00

MIME의 정의를 살펴보자면, Multipurpose Internet Mail Extensions 의 약자로 일종의 암호화 비스무리한 파일 변환을 뜻한다. MIME은 이메일과 함께 동봉할 attachment 파일을 텍스트 문자로 전환해서 이메일 시스템을 통해 전달하기 위한 목적으로 개발되었기 때문에, 이름이 Internet Mail Extension 이다. 하지만 이제는 웹을 통해서 여러 형태의 파일을 전달하는데 두루 쓰이고 있다.


왜 UUEncode 방식이 있는데 MIME 이란게 등장했느냐? UUEncode 방식에는 단점이 있었기 때문이다. 예를 들면, 문서의 끝부분의 공백이 사실은 공백이 아니라 모두 변환되어야 할 값들을 나타내는데, 이 공백을 무시하는 시스템의 경우엔 UUEncode 파일을 원형 그대로 전달 받을 수 없었다는 것등과 같은 문제가 있었다.


그래서 UUEncode 방식을 대폭 보완한 새로운 인코딩 방식이 등장하게 되었고, 이걸 일컬어 MIME 이라고 하는 것이다. MIME 은 특히 기존의 UUEncode 방식에서는 없었던 '파일 포맷' (또는 Content-type) 정보도 함께 담을 수 있다. 즉 지금 전달되는 이 파일은 GIF 파일이다, MOV 파일이다 등을 나타내 주는 딱지를 붙일 수 있었다. 이렇게 MIME 에서 사용하는 인코딩 방식을 base64 라고 한다. 방식은 위에서 살펴본 것과 유사하다. 8 비트 3 개를 6 비트 4개로 바꿔서, 적절한 변형을 하는 것이다.


이렇게 해서 텍스트만이 전달될 수 있는 기존의 이메일 시스템에서도 여러 가지 바이너리 파일들을 자유롭게 주고 받을 수 있게 된 것이다. 이것을 가능하게 한 것이 MIME 입니다. 8 비트 바이너리 파일을 7 비트의 아스키문자 파일(플레인 텍스트 파일)로 바꿔주는 것이다.


MIME 타입 심층분석


MIME으로 인코딩 한 파일은 Content-type 정보를 파일의 앞부분에 담게 된다는 것을 앞에서 언급하였다. 그런 컨텐트 타입에는 여러 가지가 있다. 자주 이런 말을 들어 보았을 것이다. “어떤 마임 타입 (MIME Type) 이 웹 브라우저에서 지원된다, 안된다.”


이건 특정 컨텐트 타입의 파일을 웹 서버로부터 전달 받아서 웹 브라우저가 열 수 있다, 아니다는 의미이다. 예를 들어. 어떤 그림 파일이 있다면. 웹 브라우저가 서버에 접속해서 html 문서를 요청하면서, html 문서 내에 담긴 img 값으로 지정된 path로 부터 불러들인다.


이때 그 path 에 있는 파일이 웹 브라우저에서 지원되는 mime type 이라면 웹 브라우저를 통해서 '열어' 볼 수 있다. 브라우저 내에서 바로 뜰 수도 있고 (.gif 나 .jpg 처럼) 아니면 외부 그래픽 프로그램이 구동되면서 그 이미지 파일을 띄울 수도 있다.


음악 파일도 마찬가지이다. 바로 그런 것을 두고 '이 MIME 타입은 웹 브라우저에서 지원된다, 안된다..'는 의미이다. 주로 쓰이는 (거의 표준이 된) 대부분의 포맷들 (.gif, .jpg, .mov ) 들은 대개 웹 브라우저에서 무리 없이 열린다.


하지만 브라우저에서 지원하지 못하는 유형의 파일들은 그 파일들을 열어줄 수 있는 프로그램을 손수 지정해 주어야 하는데 웹 브라우저 세팅에 보면 외부 프로그램을 '연결' 지울 수 있다. 물론 윈도우즈는 좀 다르다.


하지만 대체로 '기본 세팅' 된 프로그램들이 대개의 컴퓨터에 깔려 있는 것이기 때문에 (ex : .zip 파일이라면 winzip , .sit 파일이라면 stuffit expander , .mp3 면 winamp. . .) 특별히 설정을 건들지 않고도 그 파일을 전송받으면 '이미' 어딘가에 깔려져 있는 winzip 이라든지 winamp 등이 자동으로 뜨면서 해당 파일을 열어주게 된다.


역으로, 어떤 MIME 타입을 자기가 원하는 특정 프로그램으로 열고 싶다면 이걸 따로 설정해줘야 된다는 얘기도 되겠죠? 이를 테면 나는 mp3 를 winamp가 아닌 다른 프로그램으로 열고 싶다면 따로 연결을 해줘야 default 로 설정된 winamp 대신에 지정된 프로그램이 실행된다는 의미이다.


매킨토시의 경우엔 웹 브라우저 (익스플로러, 넷스케이프) 내의 ' 환경설정 ' 에서 이들 MIME 타입별 연결 프로그램을 지정해 줄 수 있게 되어 있지만, 윈도우즈의 경우엔 운영체제 레벨에서 이를 지정한다. 윈도우즈 탐색기를 연 다음, '보기 -> 폴더옵션' 이라는 메뉴에 보면. 아래 그림과 같이 ' 파일형식 ' 이라는 탭이 있다. 여기에서 파일 확장자나 마임타입 별로 구동될 프로그램을 설정한다.


gif 파일의 경우를 살펴보자면,  '내용 형식' 이라는 단어 옆에 'MIME'이라고 되어있다. MIME 타입이 어떻게 설정되어 있는지를 살펴보자면, 일단 가운데 슬래쉬 ( / ) 가 있고, 슬래쉬 앞부분에는 파일의 종류를 나타내는 image, 슬래쉬 뒷부분은 파일의 포맷을 나타내는 gif를 나타내고 있다. 이렇게 MIME 타입은 '파일종류 / 파일포맷' 형태로 정의된다.


MIME 타입의 예를 들자면 아래와 같다.
application/msword
text/html
application/pdf
audio/mpeg

 
마임 타입 밑에 보면 연결 프로그램으로 인터넷 익스플로러가 설정 되어 있다. 따라서 gif 파일을 더블 클릭하면 익스플로러가 뜨면서 열리게 된다. 또는 웹 문서에 포함된 gif 파일도 바로 웹 브라우저에서 열리게 된다.


만약 image / gif 마임 타입을 다른 그래픽 프로그램 (예: 페인트샵 프로) 과 연결해 놓았다면, 웹 상에서 gif 파일이 포함된 웹 문서가 열릴 때마다 페인트샵 프로가 뜰 것이고, 데스크탑 상에서 더블클릭 해도 페인트샵 프로가 뜨면서 열릴 겁이다.


윈도우는 웹을 통해 이동할 수 있는 특정 MIME 타입을 열 외부 프로그램을 웹 브라우저에서 지정하지 않고 운영체제 레벨에서 지정을 한다. 바로 이것이 웹 브라우저와 OS 를 '불공정' 하게 혼합시켰다는 하나의 사례인 것이다. 미 법무성이 마이크로소프트를 제소한 이유가 바로 이 때문이다.


MIME 타입의 예


좀 더 쉬운 예를 들어보자. 사용자가 Windows 시스템에서 PPT 파일을 더블클릭을 하면 파워포인트가 자동 실행된다. 이 또한 MIME 설정과 유사하다고 볼 수 있다. (연결 프로그램 설정과 비슷한 개념)


그렇다면 왜 웹서버에 MIME을 설정하는 것일까? 이미지는 image/로, 오디오는 audio/, 비디오는 video/로 보통 시작한다. 그리고 application/가 있다. ppt는 application/powerpoint로 MIME 타입이 보통 웹서버에 잡혀 있습니다.


사용자가 Internet Explorer(이하, IE)에서 ppt 파일을 다운로드 받을때 저장하지 않고 "열기"를 하면 IE에서 바로 ppt 파일이 브라우징 된다. 즉, 해당 클라이언트에 설치되어 있는 프로그램을 실행하여 보여주는 서버의 파일을 보통 application/로 표현을 한다.


그렇다면 왜 XHTML 패밀리 문서에 대한 MIME 타입을 application/xhtml+xml로 했을까? 이는 text로 해도 문제가 없을 것이다. 이는 브라우저에서 해당 XHTML 문서를 application으로 처리하고, 아마도 plugin된 형태의 별도의 어플리케이션에서 보여주는 것과 같이 설계가 되어있기 때문이다.


이와 비슷하게 XML 문서도 그 MIME 타입으로 text/xml과 application/xml, 이렇게 2가지 타입으로 설정이 가능하다. 이것은 정책적으로 해당 XML 파일이 브라우저상에서 text 형태로 처리되어야 할 경우에는 웹 서버가 응답(response) MIME 타입을 text/xml 으로 설정하여 클라이언트 브라우저로 전송한다.


반면에, 만약 특정 어플리케이션이 해당 XML 문서를 분석하여 처리해야 할 경우에는 웹 서버가 해당 요청에 대한 응답 MIME 타입을 application/xml 로 설정하여 클라이언트 브라우저로 전송한다.


즉, 브라우저에서 어떤식으로 XML 문서를 text 형식으로 처리할지, 특정 application에 대한 형식으로 처리할지는 클라이언트/서버간에 미리 정해진 정책상의 문제이다. MIME도 일종의 표준이 있습니다. 보통 표준을 정하면 그대로 따르는 것이다.

'old > Mobile' 카테고리의 다른 글

OSI 7계층 개념잡기  (0) 2010.05.10
인코딩과 디코딩  (0) 2010.05.10
Ad-Hoc 이란?  (0) 2010.05.10
아스키(Ascii)와 바이너리(Binary) 개념잡기  (0) 2010.05.10
음수 2진수와 10진수간의 변환 방법  (0) 2010.05.10
Posted by jazzlife
,

컴퓨터는 오직 0과 1로 이뤄진 이진수만을 이해할 수 있다. 바이너리(binary)라는 단어가 사전적으로 ‘이진의’, ‘이진수의’라는 의미이다. 그런데 컴퓨터에서 'ㄱ, ㄴ, ㄷ' 이나 'a, b, Z, T'등의 문자를 표시하려다 보니, 이 각각의 문자들을 숫자로 지정해야 만 했다. 즉 a는 십진수로 97, z는 122, 이런 식으로 규정을 해야 했다. 이렇게 규정을 해놓으면 그 값을 이진수로 변환해서 컴퓨터가 각 문자를 식별할 수 있었다.


컴퓨터 등장 초기에는 오늘날의 데스크탑과 같이 공통된 표준으로 나오지 않았다. 각자 고유의 특징을 가지고 하드웨어가 제작되었고, 거기에 맞춰 소프트웨어가 개발되었다. 그래서 각 문자들에 해당되는 값 역시 각 컴퓨터마다 달랐다. 이 때문에 서로 다른 회사에서 만든 컴퓨터간에 데이터를 교환해야 할 필요가 생긴 경우, 굉장히 곤란한 상황이 발생하게 되었다. 이 컴퓨터에서는 'abc' 라고 저장하였는데, 다른 컴퓨터에서 열어보면 '!#F' 라고 열린다든지 하는 의도하지 않은 일들이 발생하였다.


그래서 각 문자에 해당하는 숫자 값을 하나로 통일하자는 목적아래, ANSI 라는 표준을 정하는 단체에서 ASCII 라는 표준을 제정하였다. ASCII 는 American Standard Code for Information Interchange 의 약자로, 단어 의미대로 정보 교환을 위한 미국 표준 코드였다. 그런데 컴퓨터가 정보를 처리할 때 사용되는 기본 단위는 바이트(byte)였다. 8 자리의 이진수를 바이트 라고 한다.


1 바이트는 아래와 같이 8개의 2진수의 모음이다.
11001101


1 바이트는 십진수로 고쳐보면, 최소 0 (00000000) 에서 최대 255 (11111111) 사이의 값이다. 그래서 a 는 97, W 는 87, 이런 식으로 0 에서 255 사이에 있는 값들을 각 알파벳, 특수문자 등에 하나하나 대응해서 값을 지정을 하였다. 그러면 여기서 의문이 생기는 것이 “왜 a 를 1 이나 2 처럼 앞의 숫자로 할당하지 않고 저렇게 큰 숫자로 했을까”라는 의문이 생긴다. 그건 'control character' 때문이다.


당시 컴퓨터 단말기의 표준격인 TTY 에 쓰이던 조절 문자를 위해 앞의 0-32 를 남겨둬야 했다. 조절 문자라는 것은 폰트가 바뀐다든지, 전송의 끝을 알리는 문자라든지 하는 특수한 작업, 기능, 이벤트를 알려주는 특수 문자였다.


그 결과 조절 문자에 할당한 0-32 다음 값인 33부터 '보통의 문자' (화면상에 보여지는)를 하나하나 짝을 지우게 되었다. 아스키 33 은 ! 이고, 34 는 ", 35 는 #, 이런 형태로, 그렇게 해보면 0 부터 127 까지 사용해서 모든 '문자'를 모두 표시할 수 있다.


그러면 당연히 맨 마지막 비트 (128 부터 255 까지)는 사용하지 않아도 되니깐 8 자리 이진수의 첫번째 숫자는 '0' 으로 세팅된다. 그래서, 아스키 문자는 이진수로 바꾸었을 때 첫째 숫자가 0 이다. '7 비트 아스키 문자' 라는 용어는 그런 원리로 등장하였다. (물론 이 8 비트를 모두 다 사용하는 문자 세트도 있지만, 일단 이렇게 이해하자.)


이제 아스키가 뭔지?, 왜 아스키 문자는 '7비트' 인지?, 그리고 첫 문자값을 33으로 설정했는지? 등에 대해 이해하였을 것이다. 도대체 이러한 것들이 MIME와 무슨 상관이 있느냐? 문제는 컴퓨터 사이에서 이동되는 파일이 모두 다 아스키 문자로 이뤄진 텍스트 파일이 아니라는 데서 출발한다.

'old > Mobile' 카테고리의 다른 글

OSI 7계층 개념잡기  (0) 2010.05.10
인코딩과 디코딩  (0) 2010.05.10
Ad-Hoc 이란?  (0) 2010.05.10
MIME 개념잡기  (0) 2010.05.10
음수 2진수와 10진수간의 변환 방법  (0) 2010.05.10
Posted by jazzlife
,

음수 2진수와 10진수간의 변환 방법


2진수 11110111을 10진수로 표현하는 방법이다.

다들 아시다시피 첫번째 비트가 영이기 때문에 요놈은 음수라는걸 인지하고 변환들어가자.


1단계, 1은 0으로, 0은 1으로 변환한다.(1의보수)

00001000


2단계, 1단계에서 나온 결과에 1을 더하자. (2의보수)

00001001


3단계, 2단계 결과를 10진수화 하여 '-'기호를 붙이자.

-9

--------------------------------------------------

즉, 2진수 11110111 은 10진수로 -9 이다.


역으로 10진수 -9를 2진수로 표현하는 방법이다.
1단계, 9를 8비트로 만들어보자.
00001001

2단계, -9는 음수이기 때문에, 첫번째 부호비트를 1로 바꾸자.
10001001

3단계, 0은 1로, 1은 0으로 바꾸자.(1의보수)
단, 부호비트는 그대로 유지하자.
11110110

4단계, 3단계 결과값에 1을 더하자.
11110111

---------------------------------------------------

즉, 10진수 -9 는 2진수로 11110111 이다.

'old > Mobile' 카테고리의 다른 글

OSI 7계층 개념잡기  (0) 2010.05.10
인코딩과 디코딩  (0) 2010.05.10
Ad-Hoc 이란?  (0) 2010.05.10
MIME 개념잡기  (0) 2010.05.10
아스키(Ascii)와 바이너리(Binary) 개념잡기  (0) 2010.05.10
Posted by jazzlife
,
1. garbage collection (쓰레기 수집)

- 자바 프로그램이 더 이상 참조되지 않는 메모리를 모아 시스템에 되돌려 주는 것.

- 프로그래머는 메모리에 대해서는 아무 관여하지 않는다.

- 참조중인 객체를 찾는 방법

참조계수 기법 (reference-counting) : 객체를 참조하는 갯수를 추적하여 참조중인 객체를 구분.

- heap 안에 있는 각 객체마다 참조계수(reference-count)가 유지

- 어떤 객체가 처음 생겨서 그 객체를 참조하는 변수에 배정하면 참조계수는 1이고 다른 변수가 그 객체를 참조할 때 참조계수는 1씩 증가한다. 그리고 객체를 참조하는 변수가 다른 값이 배정되면 1씩 감소한다.

- 참조계수가 0인 객체 : garbage

추적 기법 (tracing) : 루트 노드에서 시작하는 참조의 그래프를 추적하는 방법.


① simple garbage collection

mark-sweep 방식

- 주기적으로 전체 메모리를 탐색하여 garbage를 찾음.

- local variable array와 stack에서 참조하는 각 객체를 '유효함' 상태로 체크

- 유효하다고 체크된 각 객체들이 참조하는 다른 객체들도 역시 '유효함'

⇒ mark 단계

- 유효함 체크 과정이 끝나고 유효함 체크를 받지 못한 객체들은 garbage로 간주

- garbage로 간주된 객체는 garbage collector에 의해 수거된다.

⇒ sweep 단계

- garbage collection이 진행중인 경우, garbage collector 이외의 모든 쓰레드는 중지되어야만 한다. garbage collection 하는 중에, 유효하다고 체크되지는 않았지만 실제로는 유효한 객체에 대한 참조를 다른 쓰레드가 메모리에서 옮기고 다닐 수 있기 때문에 그 객체는 garbage로 간주될 수 있기 때문이다.


② generational garbage collection

- 메모리 일부만 탐색하여 garbage를 찾는 방식으로 mark-sweep 방식보다 전체 처리 속도 향상.

- 자바 프로그램에서 만들어지는 대부분의 객체들은 매우 짧은 시간 동안만 참조되어진다는 것과 오랫동안 유효했던 객체는 계속적으로 유효할 것이라는 전제를 바탕으로 한다.

- 객체들은 언제 생성되었는지를 기준으로 세대별로 묶이게 된다.

- heap을 객체들 한 '세대(generation)'에 의해 두 개 이상의 각 subheap으로 나눔.

- 객체가 처음 생성되면 특정 subheap에 메모리를 할당해준다.

- 대부분의 객체가 수명이 짧으므로 첫 번째 garbage collection이 일어나면 살아있는 객체는 아주 적음. 이 때 가장 어린 세대로서 살아 남은 객체는 다음 세대로 등급이 올라감 : 다른 supheap로 옮겨진다.

- 어린(younger) 객체는 늙은(older) 객체보다 더 자주 garbage collection을 함.


※ compaction 기법

- garbage collection 이후 객체들이 참조하는 메모리는 순서대로 되어 있지 않고 흩어져서 존재하기 때문에 큰 크기의 객체가 차지할 만한 곳을 찾기가 힘들어지게 된다.

⇒ fragmentation (단편화)

- 이런 단편화를 최소화하기 위해서 compaction 기법을 사용한다.

- 현재 참조되고 있는 객체를 heap의 한 쪽 끝으로 모으는 기법

- 하나의 메모리 공간이 다른 공간으로 복사되어야 함.

- 옮겨진 객체는 새로운 위치로 참조가 갱신됨.


※ finalization (객체 최종화)

- class는 static으로 선언되지 않고, 아무런 인자도 받지 않고, 어떤 값도 return 하지 않는 finalize라는 method를 사용하여 finalization을 요구할 수 있다.

- 객체가 finalizer를 가지고 있으면서 더 이상 참조되지 않으면 garbage collector는 객체에 의해 점유되고 있는 메모리를 재사용하기 위해 finalizer를 호출한다.

- finalizer는 반드시 한번 호출되어야 한다.

- 객체가 언제 어디서 어떤 순서로 finalizer를 호출한다는 것은 보장하지 않는다.

- protected void finalize() throws Throwable {

super.finalize();

}

'old > JAVA' 카테고리의 다른 글

Synchronization (ArrayList, HashMap)  (0) 2010.05.24
Collection Framework  (0) 2010.05.24
Iterator(구 Enumeration), ListIterator  (0) 2010.03.16
Stack & Queue  (0) 2010.03.15
Deep Copy vs Shallow Copy  (0) 2010.03.15
Posted by jazzlife
,

1.     at 데몬(작업 스케쥴 예약 데몬)

2.     at 데몬은 어떤 명령을 연속적으로 내려야 하는데 지금은 바쁜 경우라든지 외부에서 텔넷으로 접근해서 작업을 해야 하는데 해당 작업을 계속 하도록 하고 싶은 경우에 사용하는 작업 스케쥴 예약 데몬이며, 이 데몬은 일반적으로 root 유저만 사용이 가능하다.

3.     at 데몬의 사용법

at
데몬(atd)을 사용하기 위해서는 at, atq, atrm, batch 명령에 대해서 알아야 한다.

1.     at, atq, atrm

이 명령어는 실제적으로 atd 데몬에 명령어를 내리는 명령어로 명령해에는 언제 실행할 것인지 그리고 무슨 옵션으로 실행할 것인지에 대한 옵션이 있고, 명령어를 엔터를 쳐서 입력하면 커서가 한 줄 밑으로 내려가게 되는데 여기서 실행할 명령을 순서대로 하나씩 쳐서 입력한 뒤에 다 끝나면 [Ctrl]+[D] 를 눌러서 나가면 된다.

사용법

2.     Usage: at [-V] [-q x] [-f file] [-m] time
           atq [-V] [-q x] [-v]
           atrm [-V] [-q x] job ...
           batch [-V] [-f file] [-m]

옵션

3.     -V : 버전을 보여준다.
-q queue :
실행할 대기큐를 정할 수 있다. 사용할 수 있는 문자는 a-z, A-Z 까지이며, a가 기본 큐이다. 특별히 b batch 명령에서 사용하는 큐이며 그 외에는 높은 글자를 사용할 수록 nice값을 높여서 실행하게 된다. atq로 큐를 확인할 수 있다.
-f file :
표준 입력이 아닌, 뒤에 써주는 파일에서 명령어를 읽어들인다.
-m :
실행한 결과를 메일로 통보해준다.
-l : atq
를 실행하는 alias이다.
-d : atrm
을 실행하는 alias이다.
-v :
끝난 작업이지만 아직 큐에서 삭제되지 않은 작업을 적어준다.
-c :
작업 리스트를 명령행을 포함하여 표준 출력으로 보여준다.
TIME :
실행할 시간을 기록한다. 기본적으로 "hh:mm YYYY-MM-DD"로 적는다. hh:mm은 시간으로 24시간제를 기본으로 한다.

사용예

4.     실제 명령은 아래와 같이 "at + 실행할 시간"으로 명령을 내리면 at>라는 프롬프트가 뜨는데 여기서 부터 실제 내릴 명령을 계속적으로 써주면 된다.

[root@bluestar bin]# at 12:00 2000-03-02
at> find / -name *linux* -print
at> tee ~/linux.txt
at> < EOT>   <- [EOT]
는 실제는 [Ctrl]+[D]이다.
warning: commands will be executed using /bin/sh
job 1 at 2000-03-02 12:00
[root@bluestar bin]#

위에서 "at 12:00 2000-03-02" 2000 3 2일에 아래에 타이핑한 명령어를 실행하라는 뜻이며, 그 다음에 내린 명령들은 가운데 'linux'라는 패턴이 들어가는 파일을 찾아서 그 결과를 ~/linux.txt 라는 파일에 저장하라는 뜻이다.
마지막으로 [Ctrl]+[D]를 눌러서 끝내게 되는데, 시스템은 커맨드를 언제 입력했는지를 보여주며 job 1에 할당되었다고 보여주고 있다.

이번에는 다른 예를 보기로 하자.

[root@bluestar bin]# at now + 2 hours
at> find / -name *.html -print
at> tee ~/html.txt
at> mount -t vfat /dev/hda1 /mnt/win98_c
at> cp ~/html.txt /mnt/win98_c/
at> < EOT>
warning: commands will be executed using /bin/sh
job 2 at 2000-03-02 13:34
[root@bluestar bin]#

위는 지금부터 2시간 후에 아래 명령들을 실행하라는 뜻이다. hours 대신에 minutes, days, week 등이 쓰일 수 있으며, 그냥 "at now" 라고 쓰면 모든 명령을 입력한 후 [Ctrl]+[D]를 입력하는 즉시 실행한다.

이러한 atd 데몬은 쉘스크립트내에서 아주 유용하게 사용되어 질 수 있는데, 만약 어떤 쉘스크립트의 마지막 부분에 "at -m -f $0 now + 3 days"라고 써주게 되면 해당 쉘스크립트를 매번 3일마다 실행하게 되며, 그 결과를 메일로도 알려주게 된다.


이제 이렇게 예약된 작업내용(:queue)을 보려면 at 명령에 -l 옵션을 주거나 atq 명령을 써면 된다.

[root@bluestar bin]# at -l
1 2000-03-02 12:00 a
2 2000-03-02 13:34 a

[root@bluestar bin]# atq
1 2000-03-02 12:00 a
2 2000-03-02 13:34 a

큐에 있는 작업을 지우려면 atrm 명령을 사용한다.

[root@bluestar bin]# atrm 2
[root@bluestar bin]# atq
1 2000-03-02 12:00 a  <- 2
번 작업이 지워졌다.
[root@bluestar bin]#

5.     batch

batch
명령은 at와 사용법이 같다.

[root@bluestar bin]# batch
at> find / -name *.html -print
at> tee ~/html.txt
at> mount -t vfat /dev/hda1 /mnt/win98_c
at> cp ~/html.txt /mnt/win98_c/
at>
warning: commands will be executed using /bin/sh
job 3 at 2000-03-02 11:56
[root@bluestar bin]#

4.     at 사용유저 제한

이러한 atd 데몬을 아무 유저나 마음데로 쓰게 된다면 시스템에 많은 부하가 걸릴 수가 있으므로 사용유저를 제한할 필요가 있는데 이 때 사용되는 파일이 /etc/at.allow/etc/at.deny 파일이다.
보통 둘중에 하나의 파일만 사용하며, /etc/at.allow 파일을 먼저 읽게 된다. /etc/at.allow 파일에 특정 유저명을 적어넣으면 그 유저들을 제외한 나머지 유저는 at를 사용할 수 없으며, /etc/at.deny는 반대이다.

[root@bluestar /root]# cat < /etc/at.allow
bluesky
jkpark
[root@bluestar /root]#

1.     ·  cron 데몬(주기적 작업실행 데몬)

2.     crond 데몬은 일정시간 주기로 반복하는 작업을 할 수 있는 데몬이다.

3.     cron 데몬의 사용 : crontab

cron
데몬의 가동은 /etc/rc.d/init.d/crond에 있다. 보통 시스템의 어떤 런레벨이든지 cron 데몬은 부팅시 시작하도록 되어 있는데, 굳이 cron 데몬을 죽이거나 다시 시작하기 위해서는 위의 /etc/rc.d/init.d/crond 실행 스크립트를 실행하면 된다. cron 데몬에 작업을 설정하기 위해서는 cron table을 설정하는 crontab라는 실행파일을 사용한다.

사용법

4.     usage:    crontab [-u user] file
              crontab [-u user] { -e | -l | -r }
                         (default operation is replace, per 1003.2)
             -e         (edit user's crontab)
             -l          (list user's crontab)
             -r          (delete user's crontab)

옵션

5.     -u 사용자 : 특정 사용자의 crontab 파일을 다루도록 지정한다. 이 명령은 root 유저인 경우만 사용하능하며, 일반적으로는 자신의 cron 스케쥴링에 걸려있는 작업만 보거나 설정을 할 수 있다.
-l : crontab
에 등록되어 있는 스케쥴을 확인한다.
-r :
사용자의 crontab 파일을 지운다.
-e :
에디터를 사용하여 crontab 파일을 수정한다.(새로운 스케쥴을 등록한다.)
file : cron table
내용을 기록한 파일에서 읽어와서 설정한다.

사용예

6.     우선 cron table을 편집하기 위해서는 crontab -e 명령을 사용한다.
"crontab -e"
를 실행하면 cron table을 편집할 수 있도록 vi 에디터가 실행이 되는데 실행하고자 하는 내용을 입력하고 빠져 나오면 되는데 입력 형식은 아래와 같다.

01 4 * * * /etc/rc.d/init.d/network stop
15 4 * * * ~/scripts/my_script.sh
00 5 * * * /etc/rc.d/init.d/network start


위의 내용이 cron table에 입력된 내용인데 이러한 입력형식은 아래와 같다.

M H D m d cmd-line

필드명

범위

설명

M

0-59,*

분을 의미하며, *는 모든 범위를 말한다.

H

0-23,*

시를 의미한다.

D

1-31,*

날짜를 의미한다.

m

1-12,*

달을 의미한다.

d

0-7,*

요일을 의미하며, 0 7은 일요일(Sun)을 의미한다.

cmd-line

실행할 명령을 그냥 써준다.

7.    
결국 위의 입력내용중 첫번째 입력인 "01 4 * * * /etc/rc.d/init.d/network stop"은 매일 4 01분에 뒤의 "/etc/rc.d/init.d/network stop" 명령을 실행하게 되며, 다른 입력내용들도 동일하게 해석된다. 각자의 사용자가 등록한 cron table/var/spool/cron 디렉토리에 저장된다.


입력 내용의 다른 예를 보면,

30 13 * * 1-5 mail -s "It's 2pm" root% Dear root%% Are you sleeping??

같은 경우는 월요일부터 금요일까지 오후 1 30분에 해당 mail 명령을 실행하게 된다.
위에서 % 문자는 개행문자 역할을 하며(풀어쓰면 아래와 같은 명령이 된다), 한줄이 넘어가는 명령을 쓰기 위해서는 백슬래쉬(\)를 써주고 다시 개행해서 쓰면 된다.

$ mail -s "It's 2pm" root
Dear root

Are you sleeping?
[EOT]
Cc:
$


이제 이렇게 작성된 cron table을 보거나 삭제하고자 할 경우에는 -l 옵션(table을 볼 때) -r 옵션(table 삭제할 때)을 사용한다.

[root@bluestar cron]# crontab -l
# DO NOT EDIT THIS FILE - edit the master and reinstall.
# (/tmp/crontab.9706 installed on Thu Mar 2 13:26:59 2000)
# (Cron version -- $Id: crontab.c,v 2.13 1994/01/17 03:20:37 vixie Exp $)
30 13 * * 1-5 mail -s "It's 2pm" root% Dear root%% Are you sleeping??

[root@bluestar cron]# crontab -r
[root@bluestar cron]# crontab -l
no crontab for root
[root@bluestar cron]#

8.     /etc/crontab

cron table
을 작성하는 crontab 실행파일은 /usr/bin/crontab에 위치하고 있다. 그런데 /etc 디렉토리에도 crontab 파일이 있는데 이는 crontab 설정파일이다. 그 내용은 아래와 같다.

[root@bluestar /root]# cat < /etc/crontab
SHELL=/bin/bash
PATH=/sbin:/bin:/usr/sbin:/usr/bin
MAILTO=root
HOME=/

# run-parts
01 * * * * root run-parts /etc/cron.hourly
02 4 * * * root run-parts /etc/cron.daily
22 4 * * 0 root run-parts /etc/cron.weekly
42 4 1 * * root run-parts /etc/cron.monthly
[root@bluestar /root]#

SHELL
은 실행명령을 실행할 쉘의 종류를 적어준다.
PATH
는 실행파일을 검색할 PATH이다.
MAILTO
는 실행결과를 보고하는데 사용할 email 주소를 적어준다.

그리고 실행파일이 들어가야할 부분에 "root run-parts /etc/cron.xxxxxxx"라고 되어 있다.
root
는 뒤의 "run-parts ..."라고 나오는 명령행을 실행할 유저명을 적어준다. 위의 내용들은 각각 처음부터 만들어져 있는 스크립트로서 run-parts라는 스크립트를 이용해서 해당 디렉토리내에 있는 모든 실행파일을 실행하도록 되어있다. 그래서 만일 어떤 명령이 매시마다, 혹은 매일, 매주, 매달마다 실행되어야 하는 명령이라면 해당 디렉토리(/etc/cron.daily, /etc/cron.hourly, /etc/cron.monthly, /etc/cron.weekly)에 실행파일(혹은 스크립트)을 넣어주거나 링크파일을 넣어두면 된다.

참고로 /usr/bin/run-parts 스크립트의 내용은 아래와 같다.

[bluesky@bluestar bluesky]# cat < /usr/bin/run-parts
#!/bin/bash
# run-parts - concept taken from Debian
# keep going when something fails
set +e

if [ $# -lt 1 ]; then
             echo "Usage: run-parts < dir>"
             exit 1
fi

if [ ! -d $1 ]; then
             echo "Not a directory: $1"
             exit 1
fi

for i in $1/* ; do
             [ -d $i ] && continue
             if [ -x $i ]; then
                     $i
             fi
done

exit 0
[bluesky@bluestar bluesky]#

9.     첫번째 if문은 run-parts 명령을 인수가 없이 그냥 run-parts만 실행하면 명령어 뒤에 디렉토리를 명시하라는 사용법 메시지를 보여준다는 내용..
두번째 if문은 run-parts의 첫번째 인수가 디렉토리가 아니면 "Not a directory : 입력한 인수"를 출력하고 빠져나감.
세번째줄 for 문은 인수로 받은 디렉토리내의 파일들($1/*)을 하나씩 대입해서 실행파일이면([ -x $i ]) 실행한다는 내용이다.

10.   cron 데몬의 사용유저 제한

cron
데몬도 at 데몬과 마찬가지로 유저에 따라 사용을 제한할 수가 있는데 역시 /etc/cron.allow/etc/cron.deny 파일을 사용하며, 사용법은 at.allow/at.deny와 동일하다.

'old > Linux' 카테고리의 다른 글

smb.conf 설정 예  (0) 2010.08.10
일정 등록(자동 종료 등) - cron  (0) 2010.05.11
리눅스용 소스 비교 툴  (0) 2010.04.19
백그라운드 실행  (0) 2010.04.01
우분투 명령어 정리  (0) 2010.03.25
Posted by jazzlife
,

NesC Manual

old/Hmote 2010. 5. 8. 01:01
TinyOS는 NesC라는 언어를 사용하고 윈도우에서 cygwin으로 프로그램을 작성한다. 메뉴얼 첨부...

'old > Hmote' 카테고리의 다른 글

TinyOS-1.x Installation on Linux(Fedora 10)  (0) 2010.05.06
CC2420 채널변경 옵션  (0) 2010.05.06
NesC  (0) 2010.05.06
하이퍼터미널 사용  (0) 2010.05.06
UART  (0) 2010.05.06
Posted by jazzlife
,

UML workspace

old/UML_2.x 2010. 5. 7. 22:00

'old > UML_2.x' 카테고리의 다른 글

UML Tool  (0) 2010.05.07
UML2.x_실습7~10일차  (0) 2010.05.07
UML2.x_이론9일차  (0) 2010.05.07
UML2.x_이론8일차  (0) 2010.05.07
UML2.x_이론7일차  (0) 2010.05.04
Posted by jazzlife
,

UML Tool

old/UML_2.x 2010. 5. 7. 21:58
Enterprise Architect

'old > UML_2.x' 카테고리의 다른 글

UML workspace  (0) 2010.05.07
UML2.x_실습7~10일차  (0) 2010.05.07
UML2.x_이론9일차  (0) 2010.05.07
UML2.x_이론8일차  (0) 2010.05.07
UML2.x_이론7일차  (0) 2010.05.04
Posted by jazzlife
,

'old > UML_2.x' 카테고리의 다른 글

UML workspace  (0) 2010.05.07
UML Tool  (0) 2010.05.07
UML2.x_이론9일차  (0) 2010.05.07
UML2.x_이론8일차  (0) 2010.05.07
UML2.x_이론7일차  (0) 2010.05.04
Posted by jazzlife
,

UML2.x_이론9일차

old/UML_2.x 2010. 5. 7. 20:43

'old > UML_2.x' 카테고리의 다른 글

UML Tool  (0) 2010.05.07
UML2.x_실습7~10일차  (0) 2010.05.07
UML2.x_이론8일차  (0) 2010.05.07
UML2.x_이론7일차  (0) 2010.05.04
UML2.x_실습6일차  (0) 2010.05.04
Posted by jazzlife
,

UML2.x_이론8일차

old/UML_2.x 2010. 5. 7. 20:42

'old > UML_2.x' 카테고리의 다른 글

UML2.x_실습7~10일차  (0) 2010.05.07
UML2.x_이론9일차  (0) 2010.05.07
UML2.x_이론7일차  (0) 2010.05.04
UML2.x_실습6일차  (0) 2010.05.04
UML2.x_이론6일차  (0) 2010.05.04
Posted by jazzlife
,

OS_Sensors

old/API_Demo 2010. 5. 6. 16:40

[Sensors.java]

public class Sensors extends Activity {
    /** Tag string for our debug logs */
    private static final String TAG = "Sensors";

    private SensorManager mSensorManager;
    private GraphView mGraphView;

    private class GraphView extends View implements SensorListener
    {
        private Bitmap  mBitmap;
        private Paint   mPaint = new Paint();
        private Canvas  mCanvas = new Canvas();
        private Path    mPath = new Path();
        private RectF   mRect = new RectF();
        private float   mLastValues[] = new float[3*2];
        private float   mOrientationValues[] = new float[3];
        private int     mColors[] = new int[3*2];
        private float   mLastX;
        private float   mScale[] = new float[2];
        private float   mYOffset;
        private float   mMaxX;
        private float   mSpeed = 1.0f;
        private float   mWidth;
        private float   mHeight;
       
        public GraphView(Context context) {
            super(context);
            mColors[0] = Color.argb(192, 255, 64, 64);
            mColors[1] = Color.argb(192, 64, 128, 64);
            mColors[2] = Color.argb(192, 64, 64, 255);
            mColors[3] = Color.argb(192, 64, 255, 255);
            mColors[4] = Color.argb(192, 128, 64, 128);
            mColors[5] = Color.argb(192, 255, 255, 64);

            mPaint.setFlags(Paint.ANTI_ALIAS_FLAG);
            mRect.set(-0.5f, -0.5f, 0.5f, 0.5f);
            mPath.arcTo(mRect, 0, 180);
        }
       
        @Override
        protected void onSizeChanged(int w, int h, int oldw, int oldh) {
            mBitmap = Bitmap.createBitmap(w, h, Bitmap.Config.RGB_565);
            mCanvas.setBitmap(mBitmap);
            mCanvas.drawColor(0xFFFFFFFF);
            mYOffset = h * 0.5f;
            mScale[0] = - (h * 0.5f * (1.0f / (SensorManager.STANDARD_GRAVITY * 2)));
            mScale[1] = - (h * 0.5f * (1.0f / (SensorManager.MAGNETIC_FIELD_EARTH_MAX)));
            mWidth = w;
            mHeight = h;
            if (mWidth < mHeight) {
                mMaxX = w;
            } else {
                mMaxX = w-50;
            }
            mLastX = mMaxX;
            super.onSizeChanged(w, h, oldw, oldh);
        }

        @Override
        protected void onDraw(Canvas canvas) {
            synchronized (this) {
                if (mBitmap != null) {
                    final Paint paint = mPaint;
                    final Path path = mPath;
                    final int outer = 0xFFC0C0C0;
                    final int inner = 0xFFff7010;

                    if (mLastX >= mMaxX) {
                        mLastX = 0;
                        final Canvas cavas = mCanvas;
                        final float yoffset = mYOffset;
                        final float maxx = mMaxX;
                        final float oneG = SensorManager.STANDARD_GRAVITY * mScale[0];
                        paint.setColor(0xFFAAAAAA);
                        cavas.drawColor(0xFFFFFFFF);
                        cavas.drawLine(0, yoffset,      maxx, yoffset,      paint);
                        cavas.drawLine(0, yoffset+oneG, maxx, yoffset+oneG, paint);
                        cavas.drawLine(0, yoffset-oneG, maxx, yoffset-oneG, paint);
                    }
                    canvas.drawBitmap(mBitmap, 0, 0, null);

                    float[] values = mOrientationValues;
                    if (mWidth < mHeight) {
                        float w0 = mWidth * 0.333333f;
                        float w  = w0 - 32;
                        float x = w0*0.5f;
                        for (int i=0 ; i<3 ; i++) {
                            canvas.save(Canvas.MATRIX_SAVE_FLAG);
                            canvas.translate(x, w*0.5f + 4.0f);
                            canvas.save(Canvas.MATRIX_SAVE_FLAG);
                            paint.setColor(outer);
                            canvas.scale(w, w);
                            canvas.drawOval(mRect, paint);
                            canvas.restore();
                            canvas.scale(w-5, w-5);
                            paint.setColor(inner);
                            canvas.rotate(-values[i]);
                            canvas.drawPath(path, paint);
                            canvas.restore();
                            x += w0;
                        }
                    } else {
                        float h0 = mHeight * 0.333333f;
                        float h  = h0 - 32;
                        float y = h0*0.5f;
                        for (int i=0 ; i<3 ; i++) {
                            canvas.save(Canvas.MATRIX_SAVE_FLAG);
                            canvas.translate(mWidth - (h*0.5f + 4.0f), y);
                            canvas.save(Canvas.MATRIX_SAVE_FLAG);
                            paint.setColor(outer);
                            canvas.scale(h, h);
                            canvas.drawOval(mRect, paint);
                            canvas.restore();
                            canvas.scale(h-5, h-5);
                            paint.setColor(inner);
                            canvas.rotate(-values[i]);
                            canvas.drawPath(path, paint);
                            canvas.restore();
                            y += h0;
                        }
                    }

                }
            }
        }

        public void onSensorChanged(int sensor, float[] values) {
            //Log.d(TAG, "sensor: " + sensor + ", x: " + values[0] + ", y: " + values[1] + ", z: " + values[2]);
            synchronized (this) {
                if (mBitmap != null) {
                    final Canvas canvas = mCanvas;
                    final Paint paint = mPaint;
                    if (sensor == SensorManager.SENSOR_ORIENTATION) {
                        for (int i=0 ; i<3 ; i++) {
                            mOrientationValues[i] = values[i];
                        }
                    } else {
                        float deltaX = mSpeed;
                        float newX = mLastX + deltaX;

                        int j = (sensor == SensorManager.SENSOR_MAGNETIC_FIELD) ? 1 : 0;
                        for (int i=0 ; i<3 ; i++) {
                            int k = i+j*3;
                            final float v = mYOffset + values[i] * mScale[j];
                            paint.setColor(mColors[k]);
                            canvas.drawLine(mLastX, mLastValues[k], newX, v, paint);
                            mLastValues[k] = v;
                        }
                        if (sensor == SensorManager.SENSOR_MAGNETIC_FIELD)
                            mLastX += mSpeed;
                    }
                    invalidate();
                }
            }
        }

        public void onAccuracyChanged(int sensor, int accuracy) {
            // TODO Auto-generated method stub
           
        }
    }
   
    /**
     * Initialization of the Activity after it is first created.  Must at least
     * call {@link android.app.Activity#setContentView setContentView()} to
     * describe what is to be displayed in the screen.
     */
    @Override
    protected void onCreate(Bundle savedInstanceState) {
        // Be sure to call the super class.
        super.onCreate(savedInstanceState);

        mSensorManager = (SensorManager) getSystemService(SENSOR_SERVICE);
        mGraphView = new GraphView(this);
        setContentView(mGraphView);
    }

    @Override
    protected void onResume() {
        super.onResume();
        mSensorManager.registerListener(mGraphView,
                SensorManager.SENSOR_ACCELEROMETER |
                SensorManager.SENSOR_MAGNETIC_FIELD |
                SensorManager.SENSOR_ORIENTATION,
                SensorManager.SENSOR_DELAY_FASTEST);
    }
   
    @Override
    protected void onStop() {
        mSensorManager.unregisterListener(mGraphView);
        super.onStop();
    }
}

'old > API_Demo' 카테고리의 다른 글

OS_MorseCode  (0) 2010.05.06
Media_VideoView  (0) 2010.05.06
Media_MediaPlayer  (0) 2010.05.06
Views_WebView  (0) 2010.05.06
Views_Visibility  (0) 2010.05.06
Posted by jazzlife
,

OS_MorseCode

old/API_Demo 2010. 5. 6. 16:38

[MorseCode.java]

public class MorseCode extends Activity
{
    /** Tag string for our debug logs */
    private static final String TAG = "MorseCode";

    /** Our text view */
    private TextView mTextView;

    ;

    /**
     * Initialization of the Activity after it is first created.  Must at least
     * call {@link android.app.Activity#setContentView setContentView()} to
     * describe what is to be displayed in the screen.
     */
    @Override
 protected void onCreate(Bundle savedInstanceState)
    {
        // Be sure to call the super class.
        super.onCreate(savedInstanceState);

        // See assets/res/any/layout/hello_world.xml for this
        // view layout definition, which is being set here as
        // the content of our screen.
        setContentView(R.layout.morse_code);

        // Set the OnClickListener for the button so we see when it's pressed.
        findViewById(R.id.button).setOnClickListener(mClickListener);

        // Save the text view so we don't have to look it up each time
        mTextView = (TextView)findViewById(R.id.text);
    }

    /** Called when the button is pushed */
    View.OnClickListener mClickListener = new View.OnClickListener() {
        public void onClick(View v) {
            // Get the text out of the view
            String text = mTextView.getText().toString();

            // convert it using the function defined above.  See the docs for
            // android.os.Vibrator for more info about the format of this array
            long[] pattern = MorseCodeConverter.pattern(text);

            // Start the vibration
            Vibrator vibrator = (Vibrator)getSystemService(Context.VIBRATOR_SERVICE);
            vibrator.vibrate(pattern, -1);
        }
    };
}


[MorseCodeConverter.java]

/** Class that implements the text to morse code coversion */
class MorseCodeConverter {
    private static final long SPEED_BASE = 100;
    static final long DOT = SPEED_BASE;
    static final long DASH = SPEED_BASE * 3;
    static final long GAP = SPEED_BASE;
    static final long LETTER_GAP = SPEED_BASE * 3;
    static final long WORD_GAP = SPEED_BASE * 7;

    /** The characters from 'A' to 'Z' */
    private static final long[][] LETTERS = new long[][] {
        /* A */ new long[] { DOT, GAP, DASH },
        /* B */ new long[] { DASH, GAP, DOT, GAP, DOT, GAP, DOT },
        /* C */ new long[] { DASH, GAP, DOT, GAP, DASH, GAP, DOT },
        /* D */ new long[] { DASH, GAP, DOT, GAP, DOT },
        /* E */ new long[] { DOT },
        /* F */ new long[] { DOT, GAP, DOT, GAP, DASH, GAP, DOT },
        /* G */ new long[] { DASH, GAP, DASH, GAP, DOT },
        /* H */ new long[] { DOT, GAP, DOT, GAP, DOT, GAP, DOT },
        /* I */ new long[] { DOT, GAP, DOT },
        /* J */ new long[] { DOT, GAP, DASH, GAP, DASH, GAP, DASH },
        /* K */ new long[] { DASH, GAP, DOT, GAP, DASH },
        /* L */ new long[] { DOT, GAP, DASH, GAP, DOT, GAP, DOT },
        /* M */ new long[] { DASH, GAP, DASH },
        /* N */ new long[] { DASH, GAP, DOT },
        /* O */ new long[] { DASH, GAP, DASH, GAP, DASH },
        /* P */ new long[] { DOT, GAP, DASH, GAP, DASH, GAP, DOT },
        /* Q */ new long[] { DASH, GAP, DASH, GAP, DOT, GAP, DASH },
        /* R */ new long[] { DOT, GAP, DASH, GAP, DOT },
        /* S */ new long[] { DOT, GAP, DOT, GAP, DOT },
        /* T */ new long[] { DASH },
        /* U */ new long[] { DOT, GAP, DOT, GAP, DASH },
        /* V */ new long[] { DOT, GAP, DOT, GAP, DASH },
        /* W */ new long[] { DOT, GAP, DASH, GAP, DASH },
        /* X */ new long[] { DASH, GAP, DOT, GAP, DOT, GAP, DASH },
        /* Y */ new long[] { DASH, GAP, DOT, GAP, DASH, GAP, DASH },
        /* Z */ new long[] { DASH, GAP, DASH, GAP, DOT, GAP, DOT },
    };

    /** The characters from '0' to '9' */
    private static final long[][] NUMBERS = new long[][] {
        /* 0 */ new long[] { DASH, GAP, DASH, GAP, DASH, GAP, DASH, GAP, DASH },
        /* 1 */ new long[] { DOT, GAP, DASH, GAP, DASH, GAP, DASH, GAP, DASH },
        /* 2 */ new long[] { DOT, GAP, DOT, GAP, DASH, GAP, DASH, GAP, DASH },
        /* 3 */ new long[] { DOT, GAP, DOT, GAP, DOT, GAP, DASH, GAP, DASH },
        /* 4 */ new long[] { DOT, GAP, DOT, GAP, DOT, GAP, DOT, GAP, DASH },
        /* 5 */ new long[] { DOT, GAP, DOT, GAP, DOT, GAP, DOT, GAP, DOT },
        /* 6 */ new long[] { DASH, GAP, DOT, GAP, DOT, GAP, DOT, GAP, DOT },
        /* 7 */ new long[] { DASH, GAP, DASH, GAP, DOT, GAP, DOT, GAP, DOT },
        /* 8 */ new long[] { DASH, GAP, DASH, GAP, DASH, GAP, DOT, GAP, DOT },
        /* 9 */ new long[] { DASH, GAP, DASH, GAP, DASH, GAP, DASH, GAP, DOT },
    };

    private static final long[] ERROR_GAP = new long[] { GAP };

    /** Return the pattern data for a given character */
    static long[] pattern(char c) {
        if (c >= 'A' && c <= 'Z') {
            return LETTERS[c - 'A'];
        }
        if (c >= 'a' && c <= 'z') {
            return LETTERS[c - 'a'];
        }
        else if (c >= '0' && c <= '9') {
            return NUMBERS[c - '0'];
        }
        else {
            return ERROR_GAP;
        }
    }

    static long[] pattern(String str) {
        boolean lastWasWhitespace;
        int strlen = str.length();

        // Calculate how long our array needs to be.
        int len = 1;
        lastWasWhitespace = true;
        for (int i=0; i<strlen; i++) {
            char c = str.charAt(i);
            if (Character.isWhitespace(c)) {
                if (!lastWasWhitespace) {
                    len++;
                    lastWasWhitespace = true;
                }
            } else {
                if (!lastWasWhitespace) {
                    len++;
                }
                lastWasWhitespace = false;
                len += pattern(c).length;
            }
        }

        // Generate the pattern array.  Note that we put an extra element of 0
        // in at the beginning, because the pattern always starts with the pause,
        // not with the vibration.
        long[] result = new long[len+1];
        result[0] = 0;
        int pos = 1;
        lastWasWhitespace = true;
        for (int i=0; i<strlen; i++) {
            char c = str.charAt(i);
            if (Character.isWhitespace(c)) {
                if (!lastWasWhitespace) {
                    result[pos] = WORD_GAP;
                    pos++;
                    lastWasWhitespace = true;
                }
            } else {
                if (!lastWasWhitespace) {
                    result[pos] = LETTER_GAP;
                    pos++;
                }
                lastWasWhitespace = false;
                long[] letter = pattern(c);
                System.arraycopy(letter, 0, result, pos, letter.length);
                pos += letter.length;
            }
        }
        return result;
    }
}
'old > API_Demo' 카테고리의 다른 글

OS_Sensors  (0) 2010.05.06
Media_VideoView  (0) 2010.05.06
Media_MediaPlayer  (0) 2010.05.06
Views_WebView  (0) 2010.05.06
Views_Visibility  (0) 2010.05.06
Posted by jazzlife
,

Media_VideoView

old/API_Demo 2010. 5. 6. 16:26

[VideoViewDemo.java]

public class VideoViewDemo extends Activity {

    /**
     * TODO: Set the path variable to a streaming video URL or a local media
     * file path.
     */
    private String path = "";
    private VideoView mVideoView;

    @Override
    public void onCreate(Bundle icicle) {
        super.onCreate(icicle);
        setContentView(R.layout.videoview);
        mVideoView = (VideoView) findViewById(R.id.surface_view);

        if (path == "") {
            // Tell the user to provide a media file URL/path.
            Toast.makeText(
                    VideoViewDemo.this,
                    "Please edit VideoViewDemo Activity, and set path"
                            + " variable to your media file URL/path",
                    Toast.LENGTH_LONG).show();

        } else {

            /*
             * Alternatively,for streaming media you can use
             * mVideoView.setVideoURI(Uri.parse(URLstring));
             */
            mVideoView.setVideoPath(path);
            mVideoView.setMediaController(new MediaController(this));
            mVideoView.requestFocus();

        }
    }
}


[mediaplayer_2.xml]

<LinearLayout xmlns:android="http://schemas.android.com/apk/res/android"
    android:orientation="vertical"
    android:layout_width="fill_parent"
    android:layout_height="fill_parent">

    <SurfaceView android:id="@+id/surface"
        android:layout_width="wrap_content"
        android:layout_height="wrap_content"
        android:layout_gravity="center">
    </SurfaceView>
 
</LinearLayout>

'old > API_Demo' 카테고리의 다른 글

OS_Sensors  (0) 2010.05.06
OS_MorseCode  (0) 2010.05.06
Media_MediaPlayer  (0) 2010.05.06
Views_WebView  (0) 2010.05.06
Views_Visibility  (0) 2010.05.06
Posted by jazzlife
,

Media_MediaPlayer

old/API_Demo 2010. 5. 6. 16:25

[MediaPlayerDemo.java]

public class MediaPlayerDemo extends Activity {
    private Button mlocalvideo;
    private Button mresourcesvideo;
    private Button mstreamvideo;
    private Button mlocalaudio;
    private Button mresourcesaudio;
    private Button mstreamaudio;
    private static final String MEDIA = "media";
    private static final int LOCAL_AUDIO = 1;
    private static final int STREAM_AUDIO = 2;
    private static final int RESOURCES_AUDIO = 3;
    private static final int LOCAL_VIDEO = 4;
    private static final int STREAM_VIDEO = 5;
    private static final int RESOURCES_VIDEO = 6;

    @Override
    protected void onCreate(Bundle icicle) {
        // TODO Auto-generated method stub
        super.onCreate(icicle);
        setContentView(R.layout.mediaplayer_1);
        mlocalaudio = (Button) findViewById(R.id.localaudio);
        mlocalaudio.setOnClickListener(mLocalAudioListener);
        mresourcesaudio = (Button) findViewById(R.id.resourcesaudio);
        mresourcesaudio.setOnClickListener(mResourcesAudioListener);

        mlocalvideo = (Button) findViewById(R.id.localvideo);
        mlocalvideo.setOnClickListener(mLocalVideoListener);
        mstreamvideo = (Button) findViewById(R.id.streamvideo);
        mstreamvideo.setOnClickListener(mStreamVideoListener);
    }

    private OnClickListener mLocalAudioListener = new OnClickListener() {
        public void onClick(View v) {
            Intent intent =
                    new Intent(MediaPlayerDemo.this.getApplication(),
                            MediaPlayerDemo_Audio.class);
            intent.putExtra(MEDIA, LOCAL_AUDIO);
            startActivity(intent);

        }
    };
    private OnClickListener mResourcesAudioListener = new OnClickListener() {
        public void onClick(View v) {
            Intent intent =
                    new Intent(MediaPlayerDemo.this.getApplication(),
                            MediaPlayerDemo_Audio.class);
            intent.putExtra(MEDIA, RESOURCES_AUDIO);
            startActivity(intent);

        }
    };

    private OnClickListener mLocalVideoListener = new OnClickListener() {
        public void onClick(View v) {
            Intent intent =
                    new Intent(MediaPlayerDemo.this,
                            MediaPlayerDemo_Video.class);
            intent.putExtra(MEDIA, LOCAL_VIDEO);
            startActivity(intent);

        }
    };
    private OnClickListener mStreamVideoListener = new OnClickListener() {
        public void onClick(View v) {
            Intent intent =
                    new Intent(MediaPlayerDemo.this,
                            MediaPlayerDemo_Video.class);
            intent.putExtra(MEDIA, STREAM_VIDEO);
            startActivity(intent);

        }
    };

}


[MediaPlayerDemo_Audio.java]

public class MediaPlayerDemo_Audio extends Activity {

    private static final String TAG = "MediaPlayerDemo";
    private MediaPlayer mMediaPlayer;
    private static final String MEDIA = "media";
    private static final int LOCAL_AUDIO = 1;
    private static final int STREAM_AUDIO = 2;
    private static final int RESOURCES_AUDIO = 3;
    private static final int LOCAL_VIDEO = 4;
    private static final int STREAM_VIDEO = 5;
    private String path;

    private TextView tx;

    @Override
    public void onCreate(Bundle icicle) {
        super.onCreate(icicle);
        tx = new TextView(this);
        setContentView(tx);
        Bundle extras = getIntent().getExtras();
        playAudio(extras.getInt(MEDIA));
    }

    private void playAudio(Integer media) {
        try {
            switch (media) {
                case LOCAL_AUDIO:
                    /**
                     * TODO: Set the path variable to a local audio file path.
                     */
                    path = "";
                    if (path == "") {
                        // Tell the user to provide an audio file URL.
                        Toast
                                .makeText(
                                        MediaPlayerDemo_Audio.this,
                                        "Please edit MediaPlayer_Audio Activity, "
                                                + "and set the path variable to your audio file path."
                                                + " Your audio file must be stored on sdcard.",
                                        Toast.LENGTH_LONG).show();

                    }
                    mMediaPlayer = new MediaPlayer();
                    mMediaPlayer.setDataSource(path);
                    mMediaPlayer.prepare();
                    mMediaPlayer.start();
                    break;
                case RESOURCES_AUDIO:
                    /**
                     * TODO: Upload a audio file to res/raw folder and provide
                     * its resid in MediaPlayer.create() method.
                     */
                    mMediaPlayer = MediaPlayer.create(this, R.raw.test_cbr);
                    mMediaPlayer.start();

            }
            tx.setText("Playing audio...");

        } catch (Exception e) {
            Log.e(TAG, "error: " + e.getMessage(), e);
        }

    }

    @Override
    protected void onDestroy() {
        super.onDestroy();
        // TODO Auto-generated method stub
        if (mMediaPlayer != null) {
            mMediaPlayer.release();
            mMediaPlayer = null;
        }

    }
}


[MediaPlayerDemo._Video.java]

public class MediaPlayerDemo_Video extends Activity implements
        OnBufferingUpdateListener, OnCompletionListener,
        OnPreparedListener, OnVideoSizeChangedListener, SurfaceHolder.Callback {

    private static final String TAG = "MediaPlayerDemo";
    private int mVideoWidth;
    private int mVideoHeight;
    private MediaPlayer mMediaPlayer;
    private SurfaceView mPreview;
    private SurfaceHolder holder;
    private String path;
    private Bundle extras;
    private static final String MEDIA = "media";
    private static final int LOCAL_AUDIO = 1;
    private static final int STREAM_AUDIO = 2;
    private static final int RESOURCES_AUDIO = 3;
    private static final int LOCAL_VIDEO = 4;
    private static final int STREAM_VIDEO = 5;
    private boolean mIsVideoSizeKnown = false;
    private boolean mIsVideoReadyToBePlayed = false;

    /**
     *
     * Called when the activity is first created.
     */
    @Override
    public void onCreate(Bundle icicle) {
        super.onCreate(icicle);
        setContentView(R.layout.mediaplayer_2);
        mPreview = (SurfaceView) findViewById(R.id.surface);
        holder = mPreview.getHolder();
        holder.addCallback(this);
        holder.setType(SurfaceHolder.SURFACE_TYPE_PUSH_BUFFERS);
        extras = getIntent().getExtras();

    }

    private void playVideo(Integer Media) {
        doCleanUp();
        try {

            switch (Media) {
                case LOCAL_VIDEO:
                    /*
                     * TODO: Set the path variable to a local media file path.
                     */
                    path = "";
                    if (path == "") {
                        // Tell the user to provide a media file URL.
                        Toast
                                .makeText(
                                        MediaPlayerDemo_Video.this,
                                        "Please edit MediaPlayerDemo_Video Activity, "
                                                + "and set the path variable to your media file path."
                                                + " Your media file must be stored on sdcard.",
                                        Toast.LENGTH_LONG).show();

                    }
                    break;
                case STREAM_VIDEO:
                    /*
                     * TODO: Set path variable to progressive streamable mp4 or
                     * 3gpp format URL. Http protocol should be used.
                     * Mediaplayer can only play "progressive streamable
                     * contents" which basically means: 1. the movie atom has to
                     * precede all the media data atoms. 2. The clip has to be
                     * reasonably interleaved.
                     *
                     */
                    path = "";
                    if (path == "") {
                        // Tell the user to provide a media file URL.
                        Toast
                                .makeText(
                                        MediaPlayerDemo_Video.this,
                                        "Please edit MediaPlayerDemo_Video Activity,"
                                                + " and set the path variable to your media file URL.",
                                        Toast.LENGTH_LONG).show();

                    }

                    break;


            }

            // Create a new media player and set the listeners
            mMediaPlayer = new MediaPlayer();
            mMediaPlayer.setDataSource(path);
            mMediaPlayer.setDisplay(holder);
            mMediaPlayer.prepare();
            mMediaPlayer.setOnBufferingUpdateListener(this);
            mMediaPlayer.setOnCompletionListener(this);
            mMediaPlayer.setOnPreparedListener(this);
            mMediaPlayer.setOnVideoSizeChangedListener(this);
            mMediaPlayer.setAudioStreamType(AudioManager.STREAM_MUSIC);


        } catch (Exception e) {
            Log.e(TAG, "error: " + e.getMessage(), e);
        }
    }

    public void onBufferingUpdate(MediaPlayer arg0, int percent) {
        Log.d(TAG, "onBufferingUpdate percent:" + percent);

    }

    public void onCompletion(MediaPlayer arg0) {
        Log.d(TAG, "onCompletion called");
    }

    public void onVideoSizeChanged(MediaPlayer mp, int width, int height) {
        Log.v(TAG, "onVideoSizeChanged called");
        if (width == 0 || height == 0) {
            Log.e(TAG, "invalid video width(" + width + ") or height(" + height + ")");
            return;
        }
        mIsVideoSizeKnown = true;
        mVideoWidth = width;
        mVideoHeight = height;
        if (mIsVideoReadyToBePlayed && mIsVideoSizeKnown) {
            startVideoPlayback();
        }
    }

    public void onPrepared(MediaPlayer mediaplayer) {
        Log.d(TAG, "onPrepared called");
        mIsVideoReadyToBePlayed = true;
        if (mIsVideoReadyToBePlayed && mIsVideoSizeKnown) {
            startVideoPlayback();
        }
    }

    public void surfaceChanged(SurfaceHolder surfaceholder, int i, int j, int k) {
        Log.d(TAG, "surfaceChanged called");

    }

    public void surfaceDestroyed(SurfaceHolder surfaceholder) {
        Log.d(TAG, "surfaceDestroyed called");
    }


    public void surfaceCreated(SurfaceHolder holder) {
        Log.d(TAG, "surfaceCreated called");
        playVideo(extras.getInt(MEDIA));


    }

    @Override
    protected void onPause() {
        super.onPause();
        releaseMediaPlayer();
        doCleanUp();
    }

    @Override
    protected void onDestroy() {
        super.onDestroy();
        releaseMediaPlayer();
        doCleanUp();
    }

    private void releaseMediaPlayer() {
        if (mMediaPlayer != null) {
            mMediaPlayer.release();
            mMediaPlayer = null;
        }
    }

    private void doCleanUp() {
        mVideoWidth = 0;
        mVideoHeight = 0;
        mIsVideoReadyToBePlayed = false;
        mIsVideoSizeKnown = false;
    }

    private void startVideoPlayback() {
        Log.v(TAG, "startVideoPlayback");
        holder.setFixedSize(mVideoWidth, mVideoHeight);
        mMediaPlayer.start();
    }
}


[mediaplayer_1.xml]

<LinearLayout xmlns:android="http://schemas.android.com/apk/res/android"
    android:orientation="vertical"
    android:layout_width="fill_parent"
    android:layout_height="fill_parent"
    >
    <Button android:id="@+id/localvideo"
        android:layout_height="wrap_content"
        android:layout_width="fill_parent"
        android:text="@string/local_video"
    />
   
    <Button android:id="@+id/streamvideo"
        android:layout_height="wrap_content"
        android:layout_width="fill_parent"
        android:text="@string/stream_video"
    />
   
    <Button android:id="@+id/localaudio"
        android:layout_height="wrap_content"
        android:layout_width="fill_parent"
        android:text="@string/local_audio"
    />
   
    <Button android:id="@+id/resourcesaudio"
        android:layout_height="wrap_content"
        android:layout_width="fill_parent"
        android:text="@string/res_audio"
    />
   
</LinearLayout>

'old > API_Demo' 카테고리의 다른 글

OS_MorseCode  (0) 2010.05.06
Media_VideoView  (0) 2010.05.06
Views_WebView  (0) 2010.05.06
Views_Visibility  (0) 2010.05.06
Views_TextSwitcher  (0) 2010.05.06
Posted by jazzlife
,

Views_WebView

old/API_Demo 2010. 5. 6. 16:10
[WebView1.java]

public class WebView1 extends Activity {
   
    @Override
    public void onCreate(Bundle icicle) {
        super.onCreate(icicle);
       
        setContentView(R.layout.webview_1);
       
        final String mimeType = "text/html";
        final String encoding = "utf-8";
       
        WebView wv;
       
        wv = (WebView) findViewById(R.id.wv1);
        wv.loadData("<a href='x'>Hello World! - 1</a>", mimeType, encoding);
    }
}


[webview_1.xml]

<ScrollView xmlns:android="http://schemas.android.com/apk/res/android"
    android:layout_width="fill_parent"
    android:layout_height="wrap_content"
    android:orientation="vertical">
   
   
    <LinearLayout
        android:orientation="vertical"
        android:layout_width="fill_parent"
        android:layout_height="wrap_content">
       
        <WebView android:id="@+id/wv1"
            android:layout_height="wrap_content"
            android:layout_width="fill_parent"
            />
    </LinearLayout>
       
 </ScrollView>       

'old > API_Demo' 카테고리의 다른 글

Media_VideoView  (0) 2010.05.06
Media_MediaPlayer  (0) 2010.05.06
Views_Visibility  (0) 2010.05.06
Views_TextSwitcher  (0) 2010.05.06
Views_Tabs_Content By Intent  (0) 2010.05.06
Posted by jazzlife
,

Views_Visibility

old/API_Demo 2010. 5. 6. 16:08

[Visibility.java]

public class Visibility1 extends Activity {

    private View mVictim;

    @Override
    protected void onCreate(Bundle savedInstanceState) {
        super.onCreate(savedInstanceState);
        setContentView(R.layout.visibility_1);

        // Find the view whose visibility will change
        mVictim = findViewById(R.id.victim);

        // Find our buttons
        Button visibleButton = (Button) findViewById(R.id.vis);
        Button invisibleButton = (Button) findViewById(R.id.invis);
        Button goneButton = (Button) findViewById(R.id.gone);

        // Wire each button to a click listener
        visibleButton.setOnClickListener(mVisibleListener);
        invisibleButton.setOnClickListener(mInvisibleListener);
        goneButton.setOnClickListener(mGoneListener);
    }

    OnClickListener mVisibleListener = new OnClickListener() {
        public void onClick(View v) {
            mVictim.setVisibility(View.VISIBLE);
        }
    };

    OnClickListener mInvisibleListener = new OnClickListener() {
        public void onClick(View v) {
            mVictim.setVisibility(View.INVISIBLE);
        }
    };

    OnClickListener mGoneListener = new OnClickListener() {
        public void onClick(View v) {
            mVictim.setVisibility(View.GONE);
        }
    };
}


[visibility1.java]

<LinearLayout xmlns:android="http://schemas.android.com/apk/res/android"
    android:orientation="vertical"
    android:layout_width="fill_parent"
    android:layout_height="fill_parent">

    <LinearLayout
      android:orientation="vertical"
      android:background="@drawable/box"
      android:layout_width="fill_parent"
      android:layout_height="wrap_content">

      <TextView
          android:background="@drawable/red"
          android:layout_width="fill_parent"
          android:layout_height="wrap_content"
          android:text="@string/visibility_1_view_1"/>

      <TextView android:id="@+id/victim"
          android:background="@drawable/green"
          android:layout_width="fill_parent"
          android:layout_height="wrap_content"
          android:text="@string/visibility_1_view_2"/>

      <TextView
          android:background="@drawable/blue"
          android:layout_width="fill_parent"
          android:layout_height="wrap_content"
          android:text="@string/visibility_1_view_3"/>

    </LinearLayout>

    <LinearLayout
        android:orientation="horizontal"
        android:layout_width="wrap_content"
        android:layout_height="wrap_content">

        <Button android:id="@+id/vis"
            android:layout_width="wrap_content"
            android:layout_height="wrap_content"
            android:text="@string/visibility_1_vis"/>

        <Button android:id="@+id/invis"
            android:layout_width="wrap_content"
            android:layout_height="wrap_content"
            android:text="@string/visibility_1_invis"/>

        <Button android:id="@+id/gone"
            android:layout_width="wrap_content"
            android:layout_height="wrap_content"
            android:text="@string/visibility_1_gone"/>

    </LinearLayout>
</LinearLayout>

'old > API_Demo' 카테고리의 다른 글

Media_MediaPlayer  (0) 2010.05.06
Views_WebView  (0) 2010.05.06
Views_TextSwitcher  (0) 2010.05.06
Views_Tabs_Content By Intent  (0) 2010.05.06
Views_Tabs_Content By Factory  (0) 2010.05.06
Posted by jazzlife
,

Views_TextSwitcher

old/API_Demo 2010. 5. 6. 16:05

[TextSwitcher1.java]

public class TextSwitcher1 extends Activity implements ViewSwitcher.ViewFactory,
        View.OnClickListener {

    private TextSwitcher mSwitcher;

    private int mCounter = 0;

    @Override
    protected void onCreate(Bundle savedInstanceState) {
        super.onCreate(savedInstanceState);

        setContentView(R.layout.text_switcher_1);

        mSwitcher = (TextSwitcher) findViewById(R.id.switcher);
        mSwitcher.setFactory(this);

        Animation in = AnimationUtils.loadAnimation(this,
                android.R.anim.fade_in);
        Animation out = AnimationUtils.loadAnimation(this,
                android.R.anim.fade_out);
        mSwitcher.setInAnimation(in);
        mSwitcher.setOutAnimation(out);

        Button nextButton = (Button) findViewById(R.id.next);
        nextButton.setOnClickListener(this);

        updateCounter();
    }

    public void onClick(View v) {
        mCounter++;
        updateCounter();
    }

    private void updateCounter() {
        mSwitcher.setText(String.valueOf(mCounter));
    }

    public View makeView() {
        TextView t = new TextView(this);
        t.setGravity(Gravity.TOP | Gravity.CENTER_HORIZONTAL);
        t.setTextSize(36);
        return t;
    }
}


[text_switcher_1.xml]

<LinearLayout xmlns:android="http://schemas.android.com/apk/res/android"
    android:layout_width="fill_parent"
    android:layout_height="fill_parent"
    android:orientation="vertical">

    <Button android:id="@+id/next"
        android:layout_width="wrap_content"
        android:layout_height="wrap_content"
        android:text="@string/text_switcher_1_next_text" />

    <TextSwitcher android:id="@+id/switcher"
        android:layout_width="fill_parent"
        android:layout_height="wrap_content" />

</LinearLayout>
 

'old > API_Demo' 카테고리의 다른 글

Views_WebView  (0) 2010.05.06
Views_Visibility  (0) 2010.05.06
Views_Tabs_Content By Intent  (0) 2010.05.06
Views_Tabs_Content By Factory  (0) 2010.05.06
Views_Tabs_Content By Id  (0) 2010.05.06
Posted by jazzlife
,

[Tabs3.java]

public class Tabs3 extends TabActivity {

    @Override
    protected void onCreate(Bundle savedInstanceState) {
        super.onCreate(savedInstanceState);

        final TabHost tabHost = getTabHost();

        tabHost.addTab(tabHost.newTabSpec("tab1")
                .setIndicator("list")
                .setContent(new Intent(this, List1.class)));

        tabHost.addTab(tabHost.newTabSpec("tab2")
                .setIndicator("photo list")
                .setContent(new Intent(this, List8.class)));
       
        // This tab sets the intent flag so that it is recreated each time
        // the tab is clicked.
        tabHost.addTab(tabHost.newTabSpec("tab3")
                .setIndicator("destroy")
                .setContent(new Intent(this, Controls2.class)
                        .addFlags(Intent.FLAG_ACTIVITY_CLEAR_TOP)));
    }
}

'old > API_Demo' 카테고리의 다른 글

Views_Visibility  (0) 2010.05.06
Views_TextSwitcher  (0) 2010.05.06
Views_Tabs_Content By Factory  (0) 2010.05.06
Views_Tabs_Content By Id  (0) 2010.05.06
VIews_SeekBar  (0) 2010.05.06
Posted by jazzlife
,

[Tabs2.java]

public class Tabs2 extends TabActivity implements TabHost.TabContentFactory {

    @Override
    protected void onCreate(Bundle savedInstanceState) {
        super.onCreate(savedInstanceState);

        final TabHost tabHost = getTabHost();
        tabHost.addTab(tabHost.newTabSpec("tab1")
                .setIndicator("tab1", getResources().getDrawable(R.drawable.star_big_on))
                .setContent(this));
        tabHost.addTab(tabHost.newTabSpec("tab2")
                .setIndicator("tab2")
                .setContent(this));
        tabHost.addTab(tabHost.newTabSpec("tab3")
                .setIndicator("tab3")
                .setContent(this));
    }

    /** {@inheritDoc} */
    public View createTabContent(String tag) {
        final TextView tv = new TextView(this);
        tv.setText("Content for tab with tag " + tag);
        return tv;
    }
}


'old > API_Demo' 카테고리의 다른 글

Views_TextSwitcher  (0) 2010.05.06
Views_Tabs_Content By Intent  (0) 2010.05.06
Views_Tabs_Content By Id  (0) 2010.05.06
VIews_SeekBar  (0) 2010.05.06
Views_Spinner  (0) 2010.05.06
Posted by jazzlife
,

[Tabs1.java]

public class Tabs1 extends TabActivity {

    @Override
    protected void onCreate(Bundle savedInstanceState) {
        super.onCreate(savedInstanceState);
        TabHost tabHost = getTabHost();
       
        LayoutInflater.from(this).inflate(R.layout.tabs1, tabHost.getTabContentView(), true);

        tabHost.addTab(tabHost.newTabSpec("tab1")
                .setIndicator("tab1")
                .setContent(R.id.view1));
        tabHost.addTab(tabHost.newTabSpec("tab3")
                .setIndicator("tab2")
                .setContent(R.id.view2));
        tabHost.addTab(tabHost.newTabSpec("tab3")
                .setIndicator("tab3")
                .setContent(R.id.view3));
    }
}


[tabs1.xml]

<FrameLayout xmlns:android="http://schemas.android.com/apk/res/android"
    android:layout_width="fill_parent"
    android:layout_height="fill_parent">

    <TextView android:id="@+id/view1"
        android:background="@drawable/blue"
        android:layout_width="fill_parent"
        android:layout_height="fill_parent"
        android:text="@string/tabs_1_tab_1"/>

    <TextView android:id="@+id/view2"
        android:background="@drawable/red"
        android:layout_width="fill_parent"
        android:layout_height="fill_parent"
        android:text="@string/tabs_1_tab_2"/>

    <TextView android:id="@+id/view3"
        android:background="@drawable/green"
        android:layout_width="fill_parent"
        android:layout_height="fill_parent"
        android:text="@string/tabs_1_tab_3"/>

</FrameLayout>

'old > API_Demo' 카테고리의 다른 글

Views_Tabs_Content By Intent  (0) 2010.05.06
Views_Tabs_Content By Factory  (0) 2010.05.06
VIews_SeekBar  (0) 2010.05.06
Views_Spinner  (0) 2010.05.06
Views_ScrollBars_Fancy  (0) 2010.05.06
Posted by jazzlife
,

VIews_SeekBar

old/API_Demo 2010. 5. 6. 15:49

[SeekBar1.java]

public class SeekBar1 extends Activity implements SeekBar.OnSeekBarChangeListener {
   
    SeekBar mSeekBar;
    TextView mProgressText;
    TextView mTrackingText;
   
    @Override
    protected void onCreate(Bundle savedInstanceState) {
        super.onCreate(savedInstanceState);

        setContentView(R.layout.seekbar_1);
       
        mSeekBar = (SeekBar)findViewById(R.id.seek);
        mSeekBar.setOnSeekBarChangeListener(this);
        mProgressText = (TextView)findViewById(R.id.progress);
        mTrackingText = (TextView)findViewById(R.id.tracking);
    }

    public void onProgressChanged(SeekBar seekBar, int progress, boolean fromTouch) {
        mProgressText.setText(progress + " " +
                getString(R.string.seekbar_from_touch) + "=" + fromTouch);
    }

    public void onStartTrackingTouch(SeekBar seekBar) {
        mTrackingText.setText(getString(R.string.seekbar_tracking_on));
    }

    public void onStopTrackingTouch(SeekBar seekBar) {
        mTrackingText.setText(getString(R.string.seekbar_tracking_off));
    }
}


[seekbar_1.xml]

<LinearLayout xmlns:android="http://schemas.android.com/apk/res/android"
    android:orientation="vertical"
    android:layout_width="fill_parent"
    android:layout_height="fill_parent">

    <SeekBar android:id="@+id/seek"
        android:layout_width="fill_parent"
        android:layout_height="wrap_content"
        android:max="100"
        android:progress="50"
        android:secondaryProgress="75" />

    <TextView android:id="@+id/progress"
        android:layout_width="fill_parent"
        android:layout_height="wrap_content" />

    <TextView android:id="@+id/tracking"
        android:layout_width="fill_parent"
        android:layout_height="wrap_content" />
</LinearLayout>


[string.xml]


    <string name="seekbar_tracking_on">Tracking on</string>
    <string name="seekbar_tracking_off">Tracking off</string>
    <string name="seekbar_from_touch">from touch</string>

'old > API_Demo' 카테고리의 다른 글

Views_Tabs_Content By Factory  (0) 2010.05.06
Views_Tabs_Content By Id  (0) 2010.05.06
Views_Spinner  (0) 2010.05.06
Views_ScrollBars_Fancy  (0) 2010.05.06
Posted by jazzlife
,

Views_Spinner

old/API_Demo 2010. 5. 6. 15:42

[Spinner1.java]


public class Spinner1 extends Activity {

    @Override
    public void onCreate(Bundle savedInstanceState) {
        super.onCreate(savedInstanceState);
        setContentView(R.layout.spinner_1);

        Spinner s1 = (Spinner) findViewById(R.id.spinner1);
        ArrayAdapter<CharSequence> adapter = ArrayAdapter.createFromResource(
                this, R.array.colors, android.R.layout.simple_spinner_item);
        adapter.setDropDownViewResource(android.R.layout.simple_spinner_dropdown_item);
        s1.setAdapter(adapter);

        Spinner s2 = (Spinner) findViewById(R.id.spinner2);
        adapter = ArrayAdapter.createFromResource(this, R.array.planets,
                android.R.layout.simple_spinner_item);
        adapter.setDropDownViewResource(android.R.layout.simple_spinner_dropdown_item);
        s2.setAdapter(adapter);
    }
}


[spinner_1.xml]

<LinearLayout xmlns:android="http://schemas.android.com/apk/res/android"
    android:orientation="vertical"
    android:padding="10dip"
    android:layout_width="fill_parent"
    android:layout_height="wrap_content">

    <TextView
        android:layout_width="fill_parent"
        android:layout_height="wrap_content"
        android:text="@string/spinner_1_color"
    />

    <Spinner android:id="@+id/spinner1"
        android:layout_width="fill_parent"
        android:layout_height="wrap_content"
        android:drawSelectorOnTop="true"
        android:prompt="@string/spinner_1_color_prompt"
    />

    <TextView
        android:layout_width="fill_parent"
        android:layout_height="wrap_content"
        android:layout_marginTop="10dip"
        android:text="@string/spinner_1_planet"
    />

    <Spinner android:id="@+id/spinner2"
        android:layout_width="fill_parent"
        android:layout_height="wrap_content"
        android:drawSelectorOnTop="true"
        android:prompt="@string/spinner_1_planet_prompt"
    />

</LinearLayout>


[strings.xml]

    <string name="spinner_1_color">Color:</string>
    <string name="spinner_1_planet">Planet:</string>
    <string name="spinner_1_color_prompt">Choose a color</string>
    <string name="spinner_1_planet_prompt">Choose a planet</string>

'old > API_Demo' 카테고리의 다른 글

Views_Tabs_Content By Id  (0) 2010.05.06
VIews_SeekBar  (0) 2010.05.06
Views_ScrollBars_Fancy  (0) 2010.05.06
Views_ScrollBars_Basic  (0) 2010.05.06
Posted by jazzlife
,

[ScrollBar3.java]

public class ScrollBar3 extends Activity {
    @Override
    protected void onCreate(Bundle savedInstanceState) {
        super.onCreate(savedInstanceState);

        setContentView(R.layout.scrollbar3);
       
        findViewById(R.id.view3).setScrollBarStyle(View.SCROLLBARS_INSIDE_INSET);
    }
}


[scrollbar3.xml]

<LinearLayout
    xmlns:android="http://schemas.android.com/apk/res/android"
    android:layout_width="fill_parent"
    android:layout_height="fill_parent"
    android:orientation="vertical">

    <LinearLayout
        android:layout_width="fill_parent"
        android:layout_height="wrap_content"
        android:orientation="horizontal">

        <ScrollView
            android:layout_width="100dip"
            android:layout_height="120dip"
            android:background="#FF0000">
            <LinearLayout
                android:orientation="vertical"
                android:layout_width="fill_parent"
                android:layout_height="fill_parent">

                <TextView
                    android:layout_width="fill_parent"
                    android:layout_height="wrap_content"
                    android:text="@string/scrollbar_2_text" />
.
.
.
                <TextView
                    android:layout_width="fill_parent"
                    android:layout_height="wrap_content"
                    android:text="@string/scrollbar_2_text" />
            </LinearLayout>
        </ScrollView>

        <ScrollView
            android:layout_width="100dip"
            android:layout_height="120dip"
            android:background="#00FF00"
            android:paddingRight="12dip">
            <TextView
                android:layout_width="fill_parent"
                android:layout_height="wrap_content"
                android:text="@string/scrollbar_3_text"
                android:textColor="#000000"
                android:background="#60AA60" />
        </ScrollView>

        <ScrollView
            android:id="@+id/view3"
            android:layout_width="100dip"
            android:layout_height="120dip"
            android:background="@android:drawable/edit_text">
            <TextView
                android:layout_width="fill_parent"
                android:layout_height="wrap_content"
                android:textColor="#000000"
                android:text="@string/scrollbar_3_text" />
        </ScrollView>
    </LinearLayout>

    <LinearLayout
        android:layout_width="fill_parent"
        android:layout_height="wrap_content">
        <ScrollView
            android:id="@+id/view4"
            android:layout_width="100dip"
            android:layout_height="120dip"
            android:scrollbarStyle="outsideOverlay"
            android:background="@android:drawable/edit_text">
            <TextView
                android:layout_width="fill_parent"
                android:layout_height="wrap_content"
                android:textColor="#000000"
                android:text="@string/scrollbar_3_text" />
        </ScrollView>
        <ScrollView
            android:id="@+id/view5"
            android:layout_width="100dip"
            android:layout_height="120dip"
            android:scrollbarStyle="outsideInset"
            android:background="@android:drawable/edit_text">
            <TextView
                android:layout_width="fill_parent"
                android:layout_height="wrap_content"
                android:textColor="#000000"
                android:text="@string/scrollbar_3_text" />
        </ScrollView>
    </LinearLayout>
</LinearLayout>


'old > API_Demo' 카테고리의 다른 글

VIews_SeekBar  (0) 2010.05.06
Views_Spinner  (0) 2010.05.06
Views_ScrollBars_Fancy  (0) 2010.05.06
Views_ScrollBars_Basic  (0) 2010.05.06
Views_RatingBar  (0) 2010.05.06
Posted by jazzlife
,

[scrollbar2.xml]

<ScrollView xmlns:android="http://schemas.android.com/apk/res/android"
    android:layout_width="fill_parent"
    android:layout_height="wrap_content"
    android:scrollbarTrackVertical="@drawable/scrollbar_vertical_track"
    android:scrollbarThumbVertical="@drawable/scrollbar_vertical_thumb"
    android:scrollbarSize="12dip">

    <LinearLayout
        android:orientation="vertical"
        android:layout_width="fill_parent"
        android:layout_height="wrap_content">

        <TextView
            android:layout_width="fill_parent"
            android:layout_height="wrap_content"
            android:text="@string/scrollbar_2_text"/>
.
.
.
        <TextView
            android:layout_width="fill_parent"
            android:layout_height="wrap_content"
            android:text="@string/scrollbar_2_text"/>
    </LinearLayout>
</ScrollView>

'old > API_Demo' 카테고리의 다른 글

Views_Spinner  (0) 2010.05.06
Views_ScrollBars_Fancy  (0) 2010.05.06
Views_ScrollBars_Basic  (0) 2010.05.06
Views_RatingBar  (0) 2010.05.06
Views_RadioGroup  (0) 2010.05.06
Posted by jazzlife
,

[ScrollBar1.xml]

<ScrollView xmlns:android="http://schemas.android.com/apk/res/android"
    android:layout_width="fill_parent"
    android:layout_height="wrap_content">

    <LinearLayout
        android:orientation="vertical"
        android:layout_width="fill_parent"
        android:layout_height="wrap_content">

        <TextView
            android:layout_width="fill_parent"
            android:layout_height="wrap_content"
            android:text="@string/scrollbar_1_text"/>
.
.
.
.        <TextView
            android:layout_width="fill_parent"
            android:layout_height="wrap_content"
            android:text="@string/scrollbar_1_text"/>
    </LinearLayout>
</ScrollView>

'old > API_Demo' 카테고리의 다른 글

Views_ScrollBars_Fancy  (0) 2010.05.06
Views_RatingBar  (0) 2010.05.06
Views_RadioGroup  (0) 2010.05.06
Views_ProgressBar_Dialogs  (0) 2010.05.06
Posted by jazzlife
,

Views_RatingBar

old/API_Demo 2010. 5. 6. 15:17

[RationgBar1.java]

public class RatingBar1 extends Activity implements RatingBar.OnRatingBarChangeListener {
    RatingBar mSmallRatingBar;
    RatingBar mIndicatorRatingBar;
    TextView mRatingText;
   
    @Override
    protected void onCreate(Bundle savedInstanceState) {
        super.onCreate(savedInstanceState);

        setContentView(R.layout.ratingbar_1);
       
        mRatingText = (TextView) findViewById(R.id.rating);

        // We copy the most recently changed rating on to these indicator-only
        // rating bars
        mIndicatorRatingBar = (RatingBar) findViewById(R.id.indicator_ratingbar);
        mSmallRatingBar = (RatingBar) findViewById(R.id.small_ratingbar);
       
        // The different rating bars in the layout. Assign the listener to us.
        ((RatingBar)findViewById(R.id.ratingbar1)).setOnRatingBarChangeListener(this);
        ((RatingBar)findViewById(R.id.ratingbar2)).setOnRatingBarChangeListener(this);
    }

    public void onRatingChanged(RatingBar ratingBar, float rating, boolean fromTouch) {
        final int numStars = ratingBar.getNumStars();
        mRatingText.setText(
                getString(R.string.ratingbar_rating) + " " + rating + "/" + numStars);

        // Since this rating bar is updated to reflect any of the other rating
        // bars, we should update it to the current values.
        if (mIndicatorRatingBar.getNumStars() != numStars) {
            mIndicatorRatingBar.setNumStars(numStars);
            mSmallRatingBar.setNumStars(numStars);
        }
        if (mIndicatorRatingBar.getRating() != rating) {
            mIndicatorRatingBar.setRating(rating);
            mSmallRatingBar.setRating(rating);
        }
        final float ratingBarStepSize = ratingBar.getStepSize();
        if (mIndicatorRatingBar.getStepSize() != ratingBarStepSize) {
            mIndicatorRatingBar.setStepSize(ratingBarStepSize);
            mSmallRatingBar.setStepSize(ratingBarStepSize);
        }
    }

}


[ratingbar_1.xml]

<LinearLayout xmlns:android="http://schemas.android.com/apk/res/android"
    android:orientation="vertical"
    android:paddingLeft="10dip"
    android:layout_width="fill_parent"
    android:layout_height="fill_parent">

    <RatingBar android:id="@+id/ratingbar1"
        android:layout_width="wrap_content"
        android:layout_height="wrap_content"
        android:numStars="3"
        android:rating="2.5" />

    <RatingBar android:id="@+id/ratingbar2"
        android:layout_width="wrap_content"
        android:layout_height="wrap_content"
        android:numStars="5"
        android:rating="2.25" />

    <LinearLayout
        android:layout_width="fill_parent"
        android:layout_height="wrap_content"
        android:layout_marginTop="10dip">
       
        <TextView android:id="@+id/rating"
            android:layout_width="wrap_content"
            android:layout_height="wrap_content" />
           
        <RatingBar android:id="@+id/small_ratingbar"
            style="?android:attr/ratingBarStyleSmall"
            android:layout_marginLeft="5dip"
            android:layout_width="wrap_content"
            android:layout_height="wrap_content"
            android:layout_gravity="center_vertical" />
           
    </LinearLayout>

    <RatingBar android:id="@+id/indicator_ratingbar"
        style="?android:attr/ratingBarStyleIndicator"
        android:layout_marginLeft="5dip"
        android:layout_width="wrap_content"
        android:layout_height="wrap_content"
        android:layout_gravity="center_vertical" />
           
</LinearLayout>


[string.xml]

 <string name="ratingbar_rating">Rating:</string>

'old > API_Demo' 카테고리의 다른 글

Views_ScrollBars_Fancy  (0) 2010.05.06
Views_ScrollBars_Basic  (0) 2010.05.06
Views_RadioGroup  (0) 2010.05.06
Views_ProgressBar_Dialogs  (0) 2010.05.06
Posted by jazzlife
,

Views_RadioGroup

old/API_Demo 2010. 5. 6. 14:59

[RadioGroup1.java]

public class RadioGroup1 extends Activity implements RadioGroup.OnCheckedChangeListener,
        View.OnClickListener {

    private TextView mChoice;
    private RadioGroup mRadioGroup;

    @Override
    protected void onCreate(Bundle savedInstanceState) {
        super.onCreate(savedInstanceState);

        setContentView(R.layout.radio_group_1);
        mRadioGroup = (RadioGroup) findViewById(R.id.menu);

        // test adding a radio button programmatically
        RadioButton newRadioButton = new RadioButton(this);
        newRadioButton.setText(R.string.radio_group_snack);
        newRadioButton.setId(R.id.snack);
        LinearLayout.LayoutParams layoutParams = new RadioGroup.LayoutParams(
                RadioGroup.LayoutParams.WRAP_CONTENT,
                RadioGroup.LayoutParams.WRAP_CONTENT);
        mRadioGroup.addView(newRadioButton, 0, layoutParams);

        // test listening to checked change events
        String selection = getString(R.string.radio_group_selection);
        mRadioGroup.setOnCheckedChangeListener(this);
        mChoice = (TextView) findViewById(R.id.choice);
        mChoice.setText(selection + mRadioGroup.getCheckedRadioButtonId());

        // test clearing the selection
        Button clearButton = (Button) findViewById(R.id.clear);
        clearButton.setOnClickListener(this);
    }

    public void onCheckedChanged(RadioGroup group, int checkedId) {
        String selection = getString(R.string.radio_group_selection);
        String none = getString(R.string.radio_group_none);
        mChoice.setText(selection +
                (checkedId == View.NO_ID ? none : checkedId));
    }

    public void onClick(View v) {
        mRadioGroup.clearCheck();
    }
}


[radio_group_1.xml]

<LinearLayout xmlns:android="http://schemas.android.com/apk/res/android"
    android:layout_width="fill_parent"
    android:layout_height="fill_parent"
    android:orientation="vertical">
    <RadioGroup
        android:layout_width="fill_parent"
        android:layout_height="wrap_content"
        android:orientation="vertical"
        android:checkedButton="@+id/lunch"
        android:id="@+id/menu">
        <RadioButton
            android:text="@string/radio_group_1_breakfast"
            android:id="@+id/breakfast"
            />
        <RadioButton
            android:text="@string/radio_group_1_lunch"
            android:id="@id/lunch" />
        <RadioButton
            android:text="@string/radio_group_1_dinner"
            android:id="@+id/dinner" />
        <RadioButton
            android:text="@string/radio_group_1_all"
            android:id="@+id/all" />
        <TextView
            android:text="@string/radio_group_1_selection"
            android:id="@+id/choice" />
    </RadioGroup>
    <Button
        android:layout_width="wrap_content"
        android:layout_height="wrap_content"
        android:text="@string/radio_group_1_clear"
        android:id="@+id/clear" />
</LinearLayout>


[/res/values/strings.xml]

    <string name="radio_group_1_breakfast">Breakfast</string>
    <string name="radio_group_1_lunch">Lunch</string>
    <string name="radio_group_1_dinner">Dinner</string>
    <string name="radio_group_1_all">All of them</string>
    <string name="radio_group_1_selection">You have selected: (none)</string>
    <string name="radio_group_1_clear">Clear</string>

    <string name="radio_group_snack">Snack</string>
    <string name="radio_group_selection">"You have selected: "</string>
    <string name="radio_group_none">(none)</string>

'old > API_Demo' 카테고리의 다른 글

Views_ScrollBars_Basic  (0) 2010.05.06
Views_RatingBar  (0) 2010.05.06
Views_ProgressBar_Dialogs  (0) 2010.05.06
Views_ProgressBar_Smooth  (0) 2010.05.06
Posted by jazzlife
,