1. 일단 스크립트 작성

#!/bin/sh
cd /var/www/html
sudo echo-service start


2. /etc/init.d에 복사


3. 권한 변경 및 등록

sudo update-rc.d echo.sh defaults
sudo chmod +x echo.sh

4. insserv 경고 대처 (무시해도 상관 없다)
   스크립트에 LSB Tags 넣기

#!/bin/sh

### BEGIN INIT INFO
# Provides:          turtlelab
# Required-Start:    $remote_fs
# Required-Stop:     $remote_fs
# Default-Start:     2 3 4 5
# Default-Stop:      0 1 6
# Short-Description: Start Echo daemon at boot time
# Description:       Enable service provided by daemon.
### END INIT INFO

cd /var/www/html
sudo echo-service start


How to LSBize an Init Script

status page for dependency based boot sequencing is available.

This is a short documentation about how to make an Init Script LSB (Linux Standard Base)-compliant based on the Chapter 20 of the LSB 3.1.

LSB-compliant init scripts need to:

and should also follow Debian Policy, chapter 9.4 Console messages from init.d scripts)

Full information on the actions (and return codes) that LSB scripts have to honor are available at LSB 3.1, Chapter 20.2. Init Script Actions. Maintainers should review that section and review / adjust their init.d scripts accordingly.


Run-time dependencies

Adding run-time dependencies was a release goal for Lenny, and dependency based boot sequencing is the default in Squeeze. There is a separate wiki page documenting that effort.

By documenting the run-time dependencies for init.d scripts, it becomes possible to verify the current boot order, order the boot using these dependencies, and run boot scripts in parallel to speed up the boot process.

Add a block like this in the init.d script:

### BEGIN INIT INFO
# Provides:          scriptname
# Required-Start:    $remote_fs $syslog
# Required-Stop:     $remote_fs $syslog
# Default-Start:     2 3 4 5
# Default-Stop:      0 1 6
# Short-Description: Start daemon at boot time
# Description:       Enable service provided by daemon.
### END INIT INFO

The block shown above has a special rigid format delimited by the lines


### BEGIN INIT INFO
### END INIT INFO

where all trailing spaces shall be ignored. On the other hand, all lines inside the block shall be of the form

# {keyword}: arg1 [arg2...]

and begin with a hash character '#' in the first column followed by one single space, except for the lines following the Description keyword. The following keywords are defined

Provides: boot_facility_1 [boot_facility_2...]

  • defines boot facilities provided by this init script such that when the script is run with the start argument, the specified boot facilities will be deemed present and hence other init scripts which require those boot facilities must be started at a later stage. Normally you should use the script name as boot facility (without .sh if the file name has such an ending) but one can in the exceptional case also use the name of the service(s) that the script replaces. Boot facilities provided by scripts must not start with '$'. (Virtual facility names listed below are defined outside the init.d scripts.) Facility names should be unique within the distribution, to avoid 'duplicate provides' errors when a package is installed.

Required-Start: boot_facility_1 [boot_facility_2...]

  • defines facilities that must be available to start the script. Consider using virtual facility names as described below if adequate. If no boot facility is specified it means that this script can be started just after the bootstrap without local filesystems mounted, nor system logger, etc.

Required-Stop: boot_facility_1 [boot_facility_2...]

  • defines facilities used by the service provided by the script. The facility provided by this script should stop before the listed facilities are stopped to avoid conflicts. Normally you would include here the same facilities as for the Required-Start keyword.

Should-Start: boot_facility_1 [boot_facility_2...]

  • defines the facilities that if present should start before the service provided by the script. Nevertheless, the script can still start if the listed facilities are missing. This allows for weak dependencies which do not cause the service to fail if a facility is not available. Consider using virtual facility names as described below if adequate.

Should-Stop: boot_facility_1 [boot_facility_2...]

  • defines the facilities that if present should be stopped after this service. Normally you would include here the same facilities as those used with the Should-Start keyword.

Default-Start: run_level_1 [run_level_2...]

Default-Stop: run_level_1 [run_level_2...]

  • defines the run levels where the script should be started (stopped) by default. For example, if a service should run in runlevels 3, 4, and 5 only, specify "Default-Start: 3 4 5" and "Default-Stop: 0 1 2 6".

Short-Description: short_description

  • provide a brief description of the actions of the init script. Limited to a single line of text.

Description: multiline_description

  • provide a more complete description of the actions of the init script. May span multiple lines. In a multiline description, each continuation line shall begin with a '#' followed by tab character or a '#' followed by at least two space characters. The multiline description is terminated by the first line that does not match this criteria.

X-Start-Before: boot_facility_1 [boot_facility_2...]

X-Stop-After: boot_facility_1 [boot_facility_2...]

  • provide reverse dependencies, that appear as if the listed facilities had should-start and should-stop on the package with these headers.

X-Interactive: true

  • Indicates that this init script can interact with the user, requesting some input (for example, a password). This make sure the script run alone when the boot system starts scripts in parallell and have direct access to the tty.

For dependency tracking, the provides, required- and should- keywords are important, and the rest is unused. The default runlevels are used by a program to order the init scripts (e.g. 

insserv

) to keep track of which rc#.d directory to update when a service is added for the first time, and should reflect the intent of the service.

There are some "virtual" facility names, listed in the [LSB 3.1]. These are:

$local_fs all local filesystems are mounted. All scripts that write in /var/ need to depend on this, unless they already depend on $remote_fs.
$network low level networking (ethernet card; may imply PCMCIA running)
$named daemons which may provide hostname resolution (if present) are running. For example, daemons to query DNS, NIS+, or LDAP.
$portmap daemons providing ?SunRPC/ONCRPC portmapping service as defined in RFC 1833 (if present) are running all remote
$remote_fs all filesystems are mounted. In some LSB run-time environments, filesystems such as /usr may be remote. If the script need a mounted /usr/, it needs to depend on $remote_fs. Scripts depending on $remote_fs do not need to depend on $local_fs. During shutdown, scripts that need to run before sendsigs kills all processes should depend on $remote_fs.
$syslog system logger is operational
$time the system time has been set, for example by using a network-based time program such as ntp or rdate, or via the hardware Real Time Clock. Note that just depending on ntp will not result in an accurate time just after ntp started. It usually takes minutes until ntp actually adjusts the time. Also note that standard insserv.conf just lists hwclock as $time.
$all facility supported by 
insserv to start a script after all the scripts not depending on $all, at the end of the boot sequence. This only work for start ordering, not stop ordering. Depending on a script depending on $all will give incorrect ordering, as the script depending on $all will be started after the script depending on it.

Other (non-system) facilities may be defined by other applications. These facilities shall be named using the same conventions defined for naming init scripts. See the list of proposed Debian specific virtual facilities for more information on this.

Most of this section was originally based from a message by Petter Reinholdtsen on Debian-devel.


BTS reports related to LSB headers are usertagged.


'Web > Server' 카테고리의 다른 글

스크립트 포멧 오류가 날 때 확인  (0) 2018.02.20
웹서버 설정(apache2, php, mariadb)  (0) 2018.02.20
웹폴더 권한 설정  (0) 2018.02.20
Posted by jazzlife
,

The ^M is a carriage return character. Linux uses the line feed character to mark the end of a line, whereas Windows uses the two-character sequence CR LF. Your file has Windows line endings, which is confusing Linux.

Remove the spurious CR characters. You can do it with the following command:

sed -i -e 's/\r$//' custom_script.sh


'Web > Server' 카테고리의 다른 글

데몬 스크립트 작성 및 등록하기  (0) 2018.02.21
웹서버 설정(apache2, php, mariadb)  (0) 2018.02.20
웹폴더 권한 설정  (0) 2018.02.20
Posted by jazzlife
,


[아파치 설치]

apt-get install apache2

#a2enmod rewrite
#a2enmod headers
#a2enmod ssl
#a2dismod -f autoindex

vi /etc/apache2/apache2.conf

# deny (log file, binary, certificate, shell script, sql dump file) access.
<FilesMatch "\.(?i:log|binary|pem|enc|crt|conf|cnf|sql|sh|key)$">
    Require all denied
</FilesMatch>
  
# deny access.
<FilesMatch "(?i:composer\.json|contributing\.md|license\.txt|readme\.rst|readme\.md|readme\.txt|copyright|artisan|gulpfile\.js|package\.json|phpunit\.xml)$">
    Require all denied
</FilesMatch>
 
# Allow Lets Encrypt Domain Validation Program
<DirectoryMatch "\.well-known/acme-challenge/">
    Require all granted
</DirectoryMatch>


[PHP 설치]

apt-get install php
apt-get install libapache2-mod-php
apt-get install php-mcrypt
apt-get install php-mbstring
apt-get install php-gd
apt-get install php-curl php-xml
apt-get install php-mysql php-mongodb
apt-get install libapache2-mpm-itk

vi /etc/php/7.0/apache2/php.ini 에 아래 두줄 추가
extension=mongodb.so extension=mysqli.so

- 설정
vi /etc/apache2/mods-available/php7.0.conf

<FilesMatch ".+\.ph(p3|p4|p5|p7|t|tml)$">
    Require all denied
</FilesMatch>

vi /etc/php/7.0/apache2/php.ini
vi /etc/php/7.0/cli/php.ini

date.timezone = Asia/Seoul


/etc/init.d/apache2 restart


[MariaDB 설치]

apt-get install mariadb-server
/usr/bin/mysql_secure_installation

mysql
use mysql;
update user set plugin='' where User='root';
flush privileges;
exit;

비밀번호가 틀렸다면

use mysql;

SET PASSWORD FOR 'root'@'localhost'=PASSWORD('비밀번호');

exit;

SET PASSWORD FOR 'root'@'localhost'=PASSWORD('turtle123');
-언어설정 추가 (중요)

vi /etc/mysql/mariadb.conf.d/50-server.cnf

character-set-server = utf8mb4
collation-server = utf8mb4_unicode_ci


/etc/init.d/mysql restart


이거 안했다고 route가 제대로 안되네...


/etc/apache2/sites-available/yoursite.conf

<VirtualHost *:80>
    ServerAdmin youremail@yahoo.com
    ServerName yoursite.com
    ServerAlias www.yoursite.com
    DocumentRoot "/var/www/yoursite.com/public"
    <Directory /var/www/yoursite.com/public>
        Options Indexes FollowSymLinks MultiViews
        AllowOverride All
        Order allow,deny
        allow from all
    </Directory>
</VirtualHost>


SSL 설정


웹사이트 Apache 환경설정파일 작성

#16.12.20 설정 가이드가 추가됨

환경설정을 쉽게하도록 도와주는, 환경설정 생성기가 추가되었습니다.

https://blog.lael.be/demo-generator/apache/my-example-site.com.php

다음의 내용을 작성한다.
아래 예제에서는 사이트 환경설정파일명을 lael.be 로 가정하고 진행한다.
당신의 도메인, 사용자 아이디, 별도의 구분단어로 설정해서 사용하도록 하자.

#vi /etc/apache2/sites-available/lael.be.conf

/etc/apache2/sites-available/lael.be.conf 에 저장한다.

1
2
3
4
5
6
7
8
9
10
11
12
13
14
15
16
17
18
19
20
21
22
23
<VirtualHost *:80>
    #main domain
    ServerName lael.be
 
    #additional domain
    ServerAlias www.lael.be
    ServerAlias my-anotherdomain.com
 
    #document Root
    DocumentRoot /home/myuser1/www/
 
    #additional setting
    <Directory /home/myuser1/www/>
        Options FollowSymLinks MultiViews
        AllowOverride All
        require all granted
    </Directory>
 
    AssignUserID myuser1 myuser1
 
    ErrorLog ${APACHE_LOG_DIR}/lael.be-error.log
    CustomLog ${APACHE_LOG_DIR}/lael.be-access.log combined
</VirtualHost>

ServerAlias 는 사용안하면 빼도 되는 줄이다.

#15.09.16 추가

당신이 만약 SSL(https) 를 적용하고자 한다면 lael.be.conf 파일 하단에 다음의 코드를 추가하세요. 즉 VirtualHost 영역을 하나 더 추가.

1
2
3
4
5
6
7
8
9
10
11
12
13
14
15
16
17
18
19
20
21
22
23
24
25
26
27
28
29
30
31
32
33
34
35
36
37
38
<VirtualHost *:443>
    #main domain
    ServerName lael.be
 
    #additional domain
    ServerAlias www.lael.be
    ServerAlias my-anotherdomain.com
 
    #document Root
    DocumentRoot /home/myuser1/www/
 
    #additional setting
    <Directory /home/myuser1/www/>
        Options FollowSymLinks MultiViews
        AllowOverride All
        require all granted
    </Directory>
 
    AssignUserID myuser1 myuser1
 
    ErrorLog ${APACHE_LOG_DIR}/lael.be-error.log
    CustomLog ${APACHE_LOG_DIR}/lael.be-access.log combined
 
    Header always set Strict-Transport-Security "max-age=31536000"
 
    SSLEngine on
 
    SSLProtocol all -SSLv2 -SSLv3
 
    SSLCipherSuite ECDHE-RSA-AES128-GCM-SHA256:ECDHE-ECDSA-AES128-GCM-SHA256:ECDHE-RSA-AES256-GCM-SHA384:ECDHE-ECDSA-AES256-GCM-SHA384:DHE-RSA-AES128-GCM-SHA256:DHE-DSS-AES128-GCM-SHA256:kEDH+AESGCM:ECDHE-RSA-AES128-SHA256:ECDHE-ECDSA-AES128-SHA256:ECDHE-RSA-AES128-SHA:ECDHE-ECDSA-AES128-SHA:ECDHE-RSA-AES256-SHA384:ECDHE-ECDSA-AES256-SHA384:ECDHE-RSA-AES256-SHA:ECDHE-ECDSA-AES256-SHA:DHE-RSA-AES128-SHA256:DHE-RSA-AES128-SHA:DHE-DSS-AES128-SHA256:DHE-RSA-AES256-SHA256:DHE-DSS-AES256-SHA:DHE-RSA-AES256-SHA:AES128-GCM-SHA256:AES256-GCM-SHA384:AES128-SHA256:AES256-SHA256:AES128-SHA:AES256-SHA:AES:CAMELLIA:DES-CBC3-SHA:!aNULL:!eNULL:!EXPORT:!DES:!RC4:!MD5:!PSK:!aECDH:!EDH-DSS-DES-CBC3-SHA:!EDH-RSA-DES-CBC3-SHA:!KRB5-DES-CBC3-SHA
 
    SSLHonorCipherOrder on
 
    SSLCertificateFile "/home/myuser1/ssl/mysite_ssl.crt"
    SSLCertificateKeyFile "/home/myuser1/ssl/mysite_ssl.key"
    SSLCertificateChainFile "/home/myuser1/ssl/mysite_ssl.certchain.crt"
 
</VirtualHost>

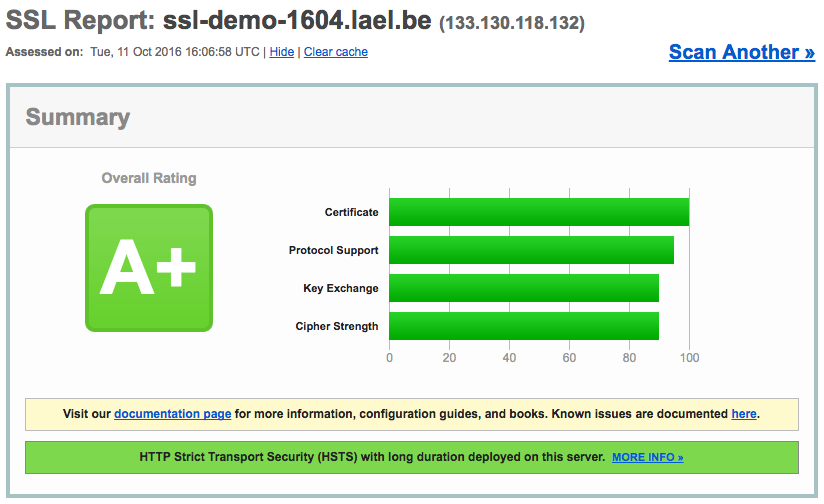
https://www.sslshopper.com/ssl-checker.html#hostname=blog.lael.be  (SSL Chain test - 인증서가 올바르게 설치되어 있는지)

https://www.ssllabs.com/ssltest/analyze.html?d=blog.lael.be (SSL Algorithm test - 안전한 암호화 통신이 설정되어 있는지)

Chain test 는 모두 Valid 이어야하고, SSL Algorithm test 는 A 이상이면 정상적인 운영이 가능하다.

라엘이가 여러 설정 값에 대해서 테스트를 해 보았고, 최적의 권장설정 값을 위와 같이 적어두었으니 그대로 쓰면 된다.

위의 설정값으로 SSL을 설치하면 A+등급을 받을 수 있을 것이다.


pv106

.

인증서 적용 테스트는 위의 사이트를 이용하여라.

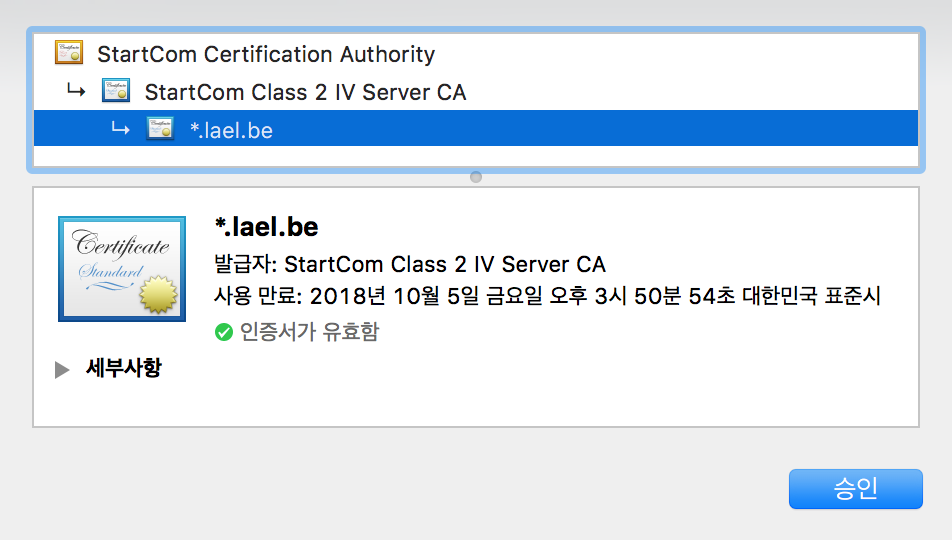
인증서 체인 파일이란 “인증서에 대한 인증서” 파일이다.

mac-ssl

< 그림 : 이 블로그는 위의 단계를 거쳐 인증된다. 이것을 체인 인증 이라고 한다. >

대통령이 당신을 인증할 때 직권으로 인증하는 것이 아니라, 대통령 -> 서울시장 -> 강남구청장 -> 삼성동장 -> 당신 의 단계를 거친다. 검증하려면 모든 단계의 보증 증서를 제공해야 하는 것이다.

인증서 파일에는 삼성동장 -> 당신  의 정보가 들어있고, (암호화 통신시 공개됨)

인증서 키 파일에는 암호화 통신을 위한 정보가 들어있고 (은행 보안카드 로 비유. 외부에 공개되지 않음.)

인증서 체인 파일에는 대통령 -> 서울시장, 서울시장 -> 강남구청장, 강남구청장 -> 삼성동장 의 정보가 들어있다. (체인 인증이라고 한다. 연결고리 인증)

인증서 체인을 올바르게 작성하지 않으면 Firefox 브라우저와 Android Chrome 브라우저에서 “인증서 정보부족” 오류가 발생하게 된다.


14) 사이트 활성화 및 적용

명령어는
#a2ensite 사이트환경설정파일명
입니다.

#a2ensite lael.be

(참고로 사이트 비활성화는

#a2dissite lael.be

입니다.)

- 아파치 설정 다시 불러오기(적용을 위해)

#service apache2 reload


참조: https://blog.lael.be/post/73

'Web > Server' 카테고리의 다른 글

데몬 스크립트 작성 및 등록하기  (0) 2018.02.21
스크립트 포멧 오류가 날 때 확인  (0) 2018.02.20
웹폴더 권한 설정  (0) 2018.02.20
Posted by jazzlife
,

웹폴더 권한 설정

Web/Server 2018. 2. 20. 15:31

폴더 권한 때문에 웹페이지를 제대로 띄우지 못하는 경우가 있다.

권한을 제대로 설정해야한다.

웹서비스의 홈디렉토리의 소유자를 www-data:www-data 로 변경하는 방법이 있다.

BASH
sudo chown -R www-data:www-data /home/unclepapa/public_html

위와 같은 방식은 www-data의 권한을 탈취당해도 www-data가 가진 권한이 매우 적기에 보안상 추천되고 있다. 하지만 이는 FTP 접속에 제한이 될 수 밖에 없는데 계정사용자가 홈디렉토리에 접속해도 소유권이 모두 www-data 이기에 업로드/수정이 불가능하게 된다.

FTP 사용에 편의를 위해서는 어떻게든 디렉토리와 파일의 소유권이 계정사용자를 포함해야 하는데, Owner 값은 id 값으로 중복될 수 없기때문에 www-data 값을 변경할 수는 없다.

Group 값은 중복될 수 있기때문에 www-data의 group에 FTP 계정을 사용할 사용자를 추가할 수 있다.

BASH
sudo usermod -a -G www-data unclepapa

이 경우 기본적인 리눅스 umask 값에 의해 디렉토리 퍼미션이 755이기에 umask 값을 002로 변경하여 생성하는 디렉토리나 파일들이 775 / 664의 값을 갖도록 해야 파일의 업로드/수정이 가능해진다.

BASH
sudo chmod -R 775 /home/unclepapa/public_html

혹은 umask 값을 수정( 특정사용자의 umask 값을 변경하려면 ~/.bashrc 에 값을 적용)

BASH
sudo vi /etc/profile

  umask 002


출처: http://webdir.tistory.com/231 [WEBDIR]

'Web > Server' 카테고리의 다른 글

데몬 스크립트 작성 및 등록하기  (0) 2018.02.21
스크립트 포멧 오류가 날 때 확인  (0) 2018.02.20
웹서버 설정(apache2, php, mariadb)  (0) 2018.02.20
Posted by jazzlife
,


[전체 과정]
1. 하드를 장착한다.
2. 장착한 하드의 파티션을 나누고 포멧한다.
3. /etc/fstab에 등록하여 마운트 한다.

[세부 과정]
- 파티션 나누기

- gui 환경에서 gparted 어플리케이션을 이용하기
$ sudo apt-get install gparted
시스템->관리->파티션편집기 실행

- shell 환경에서 파티션 나누기
 
1) dmesg란 명령어를 사용하여 장착된 SCSI HDD의 정보를 확인한다
2nd SCSI drive라면 sdb* 라는 mount id로 접속 될테니 아래와 같이 확인한다.
$ dmesg | grep sdb*

2) fdisk로 파티션 나누기 (/dev/sdb라고 가정)
$ fdisk /dev/sdb
(귀찮다. 알아서 해라 ㅡ_ㅡ;)

3) 포멧하기 (ext4 파일시스템의 경우)
$ mke2fs -t ext3 /dev/sdb

4) 마운트 시킬 디렉토리를 만들자
$ mkdir home2

5) 마운트 시켜보자
$ mount -t ext4 /dev/sdb /home2
마운트 된 것을 확인한다.
$ df -h
 
6) 부팅될 때 마운트되게 하기 위해서 /etc/fstab에 추가한다.

- 마운트 시킬 하드드라이브의 UUID를 확인하자.
$ sudo blkid

대략 이렇게 출력된다.
"/dev/sdb4: UUID="f80df0b7-6444-447e-a5ff-5c68a4e67250" TYPE="ext4""
 
출력되는 내용의 UUID를 복사하여 fstab에 등록한다.
$ sudo vi /etc/fstab

추가할 내용은 아래와 같다.
아래와 같은 UUID를 가지는 ext4 파티션을 /home2 폴더로 마운트한다는 내용이다.

# /home2 was on /dev/sdb4 second hard disk drive
UUID=f80df0b7-6444-447e-a5ff-5c68a4e67250 /home2          ext4    defaults        0       2

재부팅해서 되면 성공.

'Web > Ubuntu' 카테고리의 다른 글

hostname 변경  (0) 2011.02.19
iso 이미지 만들기, cd 굽기  (0) 2011.02.12
[error] E: Sub-process /usr/bin/dpkg returned an error code (1)  (0) 2011.01.26
shell 한글 입력  (0) 2010.11.12
[error] setuid  (0) 2010.05.06
Posted by jazzlife
,

hostname 변경

Web/Ubuntu 2011. 2. 19. 18:08
[hostname 변경]
1. hostname 명령을 사용해 현재 값 확인
2. /etc/hostname의 값을 변경
3. hostname -F /etc/hostname
4. 새로운 터미널을 열어 확인

[hosts 변경]
1. /etc/hosts에서 localhost name을 확인한다.
2. localhost name을 위에서 변경한 name으로 변경한다.

'Web > Ubuntu' 카테고리의 다른 글

하드 추가 장착 및 자동 마운트  (0) 2011.02.19
iso 이미지 만들기, cd 굽기  (0) 2011.02.12
[error] E: Sub-process /usr/bin/dpkg returned an error code (1)  (0) 2011.01.26
shell 한글 입력  (0) 2010.11.12
[error] setuid  (0) 2010.05.06
Posted by jazzlife
,
- 굽고자 하는 데이터를 raw데이터로
# mkisofs -o cdimage.iso -J -V Testiso -x/home/etc /home/backup_data
CD로 굽기 전에 raw 데이터가 제대로 만들어졌는지 mount를 통해서 확인한다.
-o: 생성될 ISO 이미지 파일 이름
-J: 윈도우즈 호환 Joliet Filesystem으로 64자의 파일이름을 허용
-V: Volume ID 생성
-x: 이 옵션 다음에 나오는 디렉토리는 즉시 제외, 반복사용가능

ex)       $ mkisofs -o Ports_Build.iso -J -V Ports_Build /source/export/20081212.1.0.5.7-56.CC/
  mkisofs -o Src.iso -J -R -A Src -V Src -v  -x/source/export/2001212.1.0.5.7-56.CC/Ports /source/export/20081212.1.0.5.7-56.CC/

$ mkdir /mnt/testiso
$ mount cdimage.raw -r -t iso9660 -o loop /mnt/testiso

scanbus 옵션을 이용해서 장치버스를 찾아낸다. 
# cdrecord -scanbus                      
Cdrecord 1.10 (i686-pc-linux-gnu) Copyright (C) 1995-2001 Jrg Schilling
Linux sg driver version: 3.1.20
Using libscg version 'schily-0.5'
scsibus0:
0,0,0 0) 'PLEXTOR ' 'CD-R PX-W1210A' '1.08' Removable CD-ROM
0,1,0 1) *
0,2,0 2) *
0,3,0 3) *
...

이제 굽는다.
위의 dev에 들어가는 값은 scanbus로 찾아낸 값이다. 
#> cdrecord -v -eject speed=8 dev=0,0,0 -data cdimage.iso(cdimage.raw)
      - dev 구조:  dev= scsibus, target, lun    [ dev=1,0 or dev=0,1,0 ]
                     ( 대개  scsibus는 0번이며 , 이경우 그냥 target 과 lun 부분만을 적어도 됨.)
      -  target :  자기 레코더의 ID 번호 
                     ( 조회방법: cdrecord   -scanbus  또는    eject /dev/scd0  )
      -v           : 레코딩 정보를 상세 출력 
      -eject     : 레코딩 후 디스크 배출 
      speed=x : 레코딩 배속 
USD RW를 사용했더니 dev=7,0,0
#> cdrecord -v eject speed=8 dev=7,0,0 -data cdimage.iso
시디가 정말로 제대로 구워졌는지 mount시켜서 한번 확인해 보도록 하자.
# mount /dev/scd0 /mnt/cdrom

[출처] Linux에서 CD 굽기|작성자 나니


'Web > Ubuntu' 카테고리의 다른 글

하드 추가 장착 및 자동 마운트  (0) 2011.02.19
hostname 변경  (0) 2011.02.19
[error] E: Sub-process /usr/bin/dpkg returned an error code (1)  (0) 2011.01.26
shell 한글 입력  (0) 2010.11.12
[error] setuid  (0) 2010.05.06
Posted by jazzlife
,

apt-get으로 패키지를 설치할 때 패키지가 깨지거나 하는 등의 문제로 아래의 에러를 내며 설치가 되지 않는 경우가 종종 생긴다.

E: Sub-process /usr/bin/dpkg returned an error code (1)

아래는 설치하려는 패키지의 파일이 다른 패키지에도 포함되어 있어 덮어씌우기를 해야하는 상황이다.

이럴 땐 패키지 파일이 있는 디렉토리로 이동해 아래처럼 강제로 덮어씌우는 옵션을 줘서 설치한다.

root@ubuntu:/var/cache/apt/archives# dpkg -i --force-overwrite 패키지명

'Web > Ubuntu' 카테고리의 다른 글

hostname 변경  (0) 2011.02.19
iso 이미지 만들기, cd 굽기  (0) 2011.02.12
shell 한글 입력  (0) 2010.11.12
[error] setuid  (0) 2010.05.06
싱글모드 부팅  (0) 2010.05.06
Posted by jazzlife
,

shell 한글 입력

Web/Ubuntu 2010. 11. 12. 11:03

$ sudo apt-get install language-pack-ko
$ sudo apt-get install language-pack-ko-base

1. Check / etc / environment

$ sudo nano / etc / environment

LANG = "ko_KR.UTF-8"
LANG = "ko_KR.EUC-KR"
LANGUAGE = "en_US: en: en_GB: en"

2. Check / etc / default / locale
3. Check / etc / profile

$ sudo nano / etc / profile

LANG = "ko_KR.UTF-8"


4. And reboot!

$ sudo shutdown -r now


'Web > Ubuntu' 카테고리의 다른 글

iso 이미지 만들기, cd 굽기  (0) 2011.02.12
[error] E: Sub-process /usr/bin/dpkg returned an error code (1)  (0) 2011.01.26
[error] setuid  (0) 2010.05.06
싱글모드 부팅  (0) 2010.05.06
우분투(ubuntu) apt-get 사용  (0) 2010.05.06
Posted by jazzlife
,

[error] setuid

Web/Ubuntu 2010. 5. 6. 10:02
$ sudo su -
sudo: must be setuid root

# chmod 4111 /usr/bin/sudo
# chmod 0440 /etc/sudoers

'Web > Ubuntu' 카테고리의 다른 글

[error] E: Sub-process /usr/bin/dpkg returned an error code (1)  (0) 2011.01.26
shell 한글 입력  (0) 2010.11.12
싱글모드 부팅  (0) 2010.05.06
우분투(ubuntu) apt-get 사용  (0) 2010.05.06
우분투 네이트온 설치  (0) 2010.05.06
Posted by jazzlife
,

싱글모드 부팅

Web/Ubuntu 2010. 5. 6. 10:01
1)grub메뉴에서 부팅하기 원하는 운영체제 선택하고 e키를 누릅니다
2)kernel이라고 시작하는 부분을 하이라이트 시키세요 그리고 e키를 누릅니다
3)이 라인의 제일 끝으로 가서 rw init=/bin/bash라고 적고 엔터 누르세요
4)b키를 눌러서 booting하십니다
5)패스워드가 필요없는 루트로 부팅이 됩니다
6)passwd USERNAME으로 비밀번호 변경하세요

비밀번호 변경하는데 문제가 없다면 다행이지만 제가 경험한 문제가 발생하면 다음과 같이 합니다

비밀번호를 묻습니다
a입력하면 엔터도 입력 안했는데
비밀번호 확인을 위해서 다시 비밀번호를 입력하라는 메세지가 나옵니다
a라고 다시 입력하세요 즉 a와 a사이에 엔터를 입력하실 필요없습니다
일단 비밀번호는 a로 변경이 된겁니다
재부팅하시고 로그인하실 때 비밀번호는 a로 설정이 되어 있으니 비번입력란에 a라고 입력하시면
됩니다 로그인 후 다시 패스워드 변경하시면 됩니다 

'Web > Ubuntu' 카테고리의 다른 글

shell 한글 입력  (0) 2010.11.12
[error] setuid  (0) 2010.05.06
우분투(ubuntu) apt-get 사용  (0) 2010.05.06
우분투 네이트온 설치  (0) 2010.05.06
우분투 네트워크 설정  (0) 2010.05.06
Posted by jazzlife
,

apt-get update

패키지 목록 업데이트


apt-get upgrade

최신버전으로 업그레이드


apt-get install 패키지명

패키지설치

ex) apt-get install ssh   -> ssh 설치

ex) apt-get install xinetd   -> xinetd 설치


apt-get remove 패키지명 

패키지를 삭제


apt-get autoremove 패키지명

패키지를 자동 삭제


==================================================================================

PS. 혹시 apt-get이 전혀 안먹히면 우분투 전체를 업데이트 하면 됨.(x윈도우에서 찾아보면 있음-_-)

      단, 인터넷은 되는 상태여야 겠죠?

'Web > Ubuntu' 카테고리의 다른 글

[error] setuid  (0) 2010.05.06
싱글모드 부팅  (0) 2010.05.06
우분투 네이트온 설치  (0) 2010.05.06
우분투 네트워크 설정  (0) 2010.05.06
git 설치  (0) 2010.05.06
Posted by jazzlife
,
안전하게 필요한 kde관련 의존 패키지들을 설치한다.

 - cmake
 - kdebase
 - alien
 - kdelibs4c2a
 - libqt3-mt
 
 # 첨부된 파일들은 /usr/lib에 설치
 - libartskde-386 
 - libartsc0_1.5.10-0ubuntu1~hardy1_i386
 - libarts1c2a_1.5.9-0ubuntu2_i386

 - kdelibs4-dev (3.5.7-0ubuntu1)
 - libsqlite3-dev (3.3.13-0ubuntu)
 - xorg-dev (7.2-0ubuntu11)
 - libao2

다 설치 했으면 nateon_1.0.175-20080621_i386.deb 설치!~

.deb 파일은
$dpkg -i *.deb 로 설치.

나머지는
apt-get install * 로 설치

'Web > Ubuntu' 카테고리의 다른 글

싱글모드 부팅  (0) 2010.05.06
우분투(ubuntu) apt-get 사용  (0) 2010.05.06
우분투 네트워크 설정  (0) 2010.05.06
git 설치  (0) 2010.05.06
의존성 알아보기  (0) 2010.05.06
Posted by jazzlife
,
우분투 서버 and 데스크탑 모두 해당되는 사항입니다.
데스크탑의 경우는 GUI 환경이라 간편하게 설정을 할 수 있습니다만, 서버의 경우는 콘솔이나 터미널 상에서 설정을 해야 합니다...

우분투를 설치하게되면 보통 dhcp로 자동으로 ip가 할당이 되게 되어 있습니다.
이것을 수동으로 잡아보도록 하겠습니다.

주의) 아래 네트워크 정보는 사용자 마다 다를 수 있습니다. vmware 환경에서 설정한 사항입니다.

우선 현재 네트워크 사항입니다. (dhcp로 할당된 ip 정보)
장치명 : eth1
ip : 192.168.32.131
netmask : 255.255.255.0
gateway : 192.168.32.2

위의 사항에서 ip 주소만 변경하여 보겠습니다. (고정 ip로 변경)
변경할 ip : 192.168.32.132


1. 현재 네트워크 사항을 확인해 봅니다.
windpyj@ubuntu:~$ ifconfig eth1
eth1      Link encap:Ethernet  HWaddr 00:0C:29:0F:88:75
          inet addr:192.168.32.131  Bcast:192.168.32.255  Mask:255.255.255.0
          inet6 addr: fe80::20c:29ff:fe0f:8875/64 Scope:Link
          UP BROADCAST RUNNING MULTICAST  MTU:1500  Metric:1
          RX packets:296 errors:0 dropped:0 overruns:0 frame:0
          TX packets:404 errors:0 dropped:0 overruns:0 carrier:0
          collisions:0 txqueuelen:1000
          RX bytes:32183 (31.4 KiB)  TX bytes:35425 (34.5 KiB)
          Interrupt:185 Base address:0x1400
windpyj@ubuntu:~$


2. ip 변경을 위해 /etc/networking/interfaces 파일을 엽니다.
windpyj@ubuntu:~$ sudo vi /etc/networking/interfaces


# This file describes the network interfaces available on your system
# and how to activate them. For more information, see interfaces(5).
# The loopback network interface
auto lo
iface lo inet loopback
# The primary network interface
auto eth1
iface eth1 inet dhcp # 여기 설정에 보시면 eth1 장치를 dhcp로 ip가 할당되게끔 되어 있습니다. 이부분을 변경하면 됩니다.


3. ip 주소를 변경하기위해 다음과 같이 세팅을 하여 봅니다.
# This file describes the network interfaces available on your system
# and how to activate them. For more information, see interfaces(5).
# The loopback network interface
auto lo
iface lo inet loopback
# The primary network interface
auto eth1
# iface eth1 inet dhcp # 기존 설정은 주석 처리 하였습니다, 다음 파란색 부분 처럼 세팅하시면 됩니다.
iface eth1 inet static
        address 192.168.32.132
        netmask 255.255.255.0
        network 192.168.32.0
        broadcast 192.168.32.255
        gateway 192.168.32.2


4. 세팅이 완료되었다면 저장하고 데몬을 재시작 하여 줍니다.
windpyj@ubuntu:~$ sudo /etc/init.d/networking restart


5. 데몬이 재시작되면 콘솔에서 접속하신 분들은 상관이 없지만 터미널로 접속하신 분들은 터미널 연결이 끊기게 됩니다. ip 주소를 변경해서 그렇겠죠?
그럼 터미널에서 변경한 ip 주소로 다시 접속하면 됩니다.


6. 재접속 후 ip주소를 확인해 봅니다.
확인해 보면 ip주소가 192.168.32.131 에서 192.168.32.132로 변경된 것을 확인 할 수 있습니다.
windpyj@ubuntu:~$ ifconfig eth1
eth1      Link encap:Ethernet  HWaddr 00:0C:29:0F:88:75
          inet addr:192.168.32.132  Bcast:192.168.32.255  Mask:255.255.255.0
          inet6 addr: fe80::20c:29ff:fe0f:8875/64 Scope:Link
          UP BROADCAST RUNNING MULTICAST  MTU:1500  Metric:1
          RX packets:1019 errors:0 dropped:0 overruns:0 frame:0
          TX packets:1404 errors:0 dropped:0 overruns:0 carrier:0
          collisions:0 txqueuelen:1000
          RX bytes:108881 (106.3 KiB)  TX bytes:118314 (115.5 KiB)
          Interrupt:185 Base address:0x1400
windpyj@ubuntu:~$

'Web > Ubuntu' 카테고리의 다른 글

우분투(ubuntu) apt-get 사용  (0) 2010.05.06
우분투 네이트온 설치  (0) 2010.05.06
git 설치  (0) 2010.05.06
의존성 알아보기  (0) 2010.05.06
root 패스워드 지정  (0) 2010.05.06
Posted by jazzlife
,

git 설치

Web/Ubuntu 2010. 5. 6. 09:59
기본 패키지 설치
$sudo apt-get build-dep git-core git-doc

http://kernel.org/pub/software/scm/git/
  사이트에서 git소스를 다운 받는다.

다운을 받았으면 make한다.

$./configure --prefix=/usr/local/git
$make
$sudo make install

'Web > Ubuntu' 카테고리의 다른 글

우분투 네이트온 설치  (0) 2010.05.06
우분투 네트워크 설정  (0) 2010.05.06
의존성 알아보기  (0) 2010.05.06
root 패스워드 지정  (0) 2010.05.06
패키지 설치 방법  (0) 2010.05.06
Posted by jazzlife
,
의존성 검사

1. 우분투 사이트에서 알아보자
http://packages.ubuntu.com/

2. apt-cache로 알아보자
$ apt-cache depends *

'Web > Ubuntu' 카테고리의 다른 글

우분투 네트워크 설정  (0) 2010.05.06
git 설치  (0) 2010.05.06
root 패스워드 지정  (0) 2010.05.06
패키지 설치 방법  (0) 2010.05.06
Ubuntu 기본 메뉴얼  (0) 2010.05.06
Posted by jazzlife
,
#sudo passwd root
사용자입력
사용자비밀번호입력
 
root에게 부여될 패스워드 입력

'Web > Ubuntu' 카테고리의 다른 글

git 설치  (0) 2010.05.06
의존성 알아보기  (0) 2010.05.06
패키지 설치 방법  (0) 2010.05.06
Ubuntu 기본 메뉴얼  (0) 2010.05.06
백그라운 명령 수행  (0) 2010.04.14
Posted by jazzlife
,
(1) .deb 파일의 경우
     $dpkg -i '.deb 파일'

(2) apt-get 사용
     apt-get install '패키지명'

(3) rpm 파일의 경우
     rpm파일은 deb 파일로 변환 후 설치.

     먼저 alien이 없다면 설치.
     $apt-get update
     $apt-get install alien   

     rpm파일을 deb파일로 변환
     $alien -k --script '.rpm 파일'
   
     $dpkg -i '.deb 파일'

'Web > Ubuntu' 카테고리의 다른 글

의존성 알아보기  (0) 2010.05.06
root 패스워드 지정  (0) 2010.05.06
Ubuntu 기본 메뉴얼  (0) 2010.05.06
백그라운 명령 수행  (0) 2010.04.14
server version에 gui 설치  (0) 2010.03.10
Posted by jazzlife
,

우분투는 무료로 배포되는 컴퓨터 운영체제(Operating System: OS)이며 훌륭한 철학을 가진 도구입니다. 훌륭한 도구를 무료로 받은 만큼 우리말 설명서도 무료로 여러분과 나누고자 합니다.

이 길라잡이는 교육적 목적으로 초보자를 대상으로 데스크탑용 우분투를 일반 가정과 일반 사무용으로 쓰는 경우에 한정해 설명합니다. 이 길라잡이는 배포처(myubuntu.tistory.com )를 표기하는 조건으로 비영리로 자유롭게 배포하실 수 있습니다. 작성과 관련해 도움말과 응원, 인용허락을 해주신 분들에게 감사드립니다. - Mike Sierra


1)사용에 앞서 알아둘 사항들:
  • 인터넷: 우분투는 인터넷과 연결된 상태여야 원할하게 설치할 수 있습니다. 유선연결 상태에서 설치를 강력히 권장합니다.
  • 게임: 오락용으로 PC를 사용한다면, MS윈도우를 사용하는 것이 더 낫습니다.
  • 버추얼머신: 우분투상에서 MS윈도우를 '버추얼머신' 프로그램을 이용해 설치/사용할 수 있습니다.

2) 설명서 활용하기:

기존 우분투 사용자: "4.2 파일관리자 '노틸러스' 110% 활용하기" 부터 읽으세요.
초보 우분투 사용자: "1.1 우분투 리눅스는 이런 것이다." 부터 읽으세요.

[파란색 글씨]는 마우스로 메뉴를 찾아 누르라는 의미입니다. 예) [파일]-[내보내기]
설정 내용은 하늘색 상자 안에 표시, 변경 내용은 붉은색으로 표시했습니다. 예)내용 => 바꿀 부분
참고사항은 옅은 녹색 안에 표시했습니다.  예) 우분투를 얄라성~하는 방법
터미널 명령어는 녹색 글씨로 굵게 표시했습니다. 예) sudo apt-get install 개념
설명서 작성자가 제안하는 내용은 옅은 노란색 안에 표시했습니다. 예) 자기 나라말을 잘해야 강국 

3) 저작권 표기와 안내

이 길라잡이는 Ubuntu documentation team이 관리하는 help.ubuntu.com의 일부 내용을 참고했으며 myubuntu.tistory.com 이용자와 지인들이 ubuntuda@gmail.com으로 보내준 내용을 포함하고 있습니다.

Ubuntu, kubuntu, Xubuntu, Edubuntu, Gobuntu는 Canonical사의 등록상표 입니다. 설명서는 the Creative Commons ShareAlike 2.5 License (CC-BY-SA)아래 배포됩니다. 작성자는 설명서의 내용이 사용자에게 유용하기를 희망하나 내용과 실행결과에 대해 어떠한 보장과 보증도 하지 않습니다.

설명서 작성에 여러모로 기여해주신 분은 다음과 같습니다.
newbie님 - 우분투 CD 마련하기 중 오류지적, su님, 海바라기님, newbie님 – 반편이 한글 문제 해결법 제시, 김훈님-노틸러스 입력불가문제 해결/ 시냅틱에서 테마 더하기, 랜덤여신님- 압축파일 관리자 한글깨짐 문제 해결, Neither님-그놈룩 적용문제 발생시 대처방법, xa님 -'주분투' 표기 오류지적, galmaegu님-판과 별명 보충설명, 떠돌이님-우분투 판과 별명, Lonnie Best님-Firestarter아이콘표시  Ian Backer님-노틸러스활용, George Norman님-우분투 속도 높이기팁 일부. Narayan님-우분투 속도 높이기 팁일부, 초보리눅서님-템플릿폴더활용

제1장 우분투 리눅스 알아두기

1.1 우분투 리눅스는 이런 것이다.
1.2 우분투의 자매들과 친척들
1.3 우분투는 어떻게 구성돼 있나
1.4 우분투의 판과 별명
1.5 우분투의 장점과 단점

제2장 설치 전에 준비사항

2.1 우분투 부트 CD 마련하기
2.2 우분투 Live-CD 기능과 활용
2.3 OS와 함께 설치되는 프로그램들
2.4 다른 OS또는 우분투로 자료 옮기기

제3장 일곱 단계로 진행하는 설치과정

3.1 설치 1~3단계, 언어, 시간대/거주지, 키보드 선택하기
3.2 설치 4단계 설치장소 선택과 판나누기
3.3 설치 5~7단계, 가져올 정보설정, 사용자와 열쇠글 설정, 최종확인

제4장 우분투를 사용하기 위해 알아야할 것들

4.1 우분투에서 프로그램 설치와 제거
4.2 파일관리자 '노틸러스' 110% 활용하기
4.3 리눅스의 그 유명한 터미널 사용방법
4.4 소프트웨어 소스(저장소) 설정하기

제5장 설치 후 다듬기

5.1 설치 후 사용환경을 다듬자
5.2 인터넷 연결: 무선 네트워크
5.3 방화벽 설치와 설정: FireStarter
5.4 한글 환경 설정: 한글 표시/ 입력문제 해결
5.5 글꼴 설정: 글꼴 추가와 글꼴 사용하기
5.6 모양새 꾸미기- '모양새'를 이용한 설정
5.7 모양새와 효과넣기- 컴피즈 퓨전
5.8 프린터/PDF프린터 설치와 활용
5.9 글쇠로 바로가기 설정과 활용
5.10 우분투 속도를 높이자

제6장 프로그램활용

6.1 우리집 컴퓨터들로 네트워크 만들기! 삼바 설정
6.2 웹사이트를 돌아보자! 불여우 설정과 기능추가
6.3 동영상을 보자! 음악을 듣자! 토템
6.4 DVD/VCD를 보자! gXine
6.5 자료 내려받기 Torrent
6.6 내 컴퓨터에서 여러가지 OS를 사용해보자: VirtualBox

'Web > Ubuntu' 카테고리의 다른 글

root 패스워드 지정  (0) 2010.05.06
패키지 설치 방법  (0) 2010.05.06
백그라운 명령 수행  (0) 2010.04.14
server version에 gui 설치  (0) 2010.03.10
freenx 설치  (0) 2010.03.10
Posted by jazzlife
,

nohup 명령

nohup COMMAND [ARG]...

ex) $ nohup ./build_target.sh&

뒤에 꼭 “&”를 붙이셔야 합니다.


이리 하면 &명령어에 의해 백그라운드로 돌면서 터미널이 종료되어도 프로세스를 유지하게 됩니다.

그리고 기타 옵션을 주지 않았을 시 명령어를 실행한 폴더에 nohup.out 이라는 파일이 생성될 겁니다.

이 파일에 실행 시 standard out 으로 출력되는 모든 텍스트 로그를 기록하게 되는데요.

다음 명령어로 로그를 확인 할 수 있습니다.


$ tail f ./nohup.out


tail은 문서의 끝부터 일정 라인을 보여주는 명령어 인데 –f 옵션으로 append 되는 내용을 추가로 보여줍니다.

tail로 로그를 확인 중 나가고 싶으시면 그냥 Ctrl+C 하시면 되겠습니다. 그 외 자세한 옵션은 man page를 확인 해 보세요.


요약)

$ cd android

$ nohup ./build_target.sh &

$ tail f ./nohup.out

nohup으로 빌드 시 백그라운드로 돌아가는 프로세스를 죽이기 위해서는 kill ef 등으로 프로세스를 찾아서 죽일 수도 있지만..

다음의 방법을 사용할 수도 있습니다.


hong.hyunjun@btb-app-lux-1:~$ jobs

[1]+  Stopped                 vi aa

[2]-  Running                 find / -name abc &

hong.hyunjun@btb-app-lux-1:~$ kill %2

hong.hyunjun@btb-app-lux-1:~$ jobs

[1]+  Stopped                 vi aa

[2]-  Terminated              find / -name abc


결론은 jobs 명령어로 백그라운드로 실행중인 (Running) job을 찾은 후 kill 명령어로 죽이시면 됩니다.

이때 kill 명령어의 인자로 jobs로 검색된 job의 인덱스 번호를 %기호와 함께 사용하시면 됩니다.


추가로 background로 실행 중인 프로세스를 foreground로 활성화 시키고 싶으시다면 fg 명령어를 활용할 수 있습니다.

hong.hyunjun@btb-app-lux-1:~$ fg %1

반대로 실행중인 프로세스를 background로 넘기고 싶으시다면 실행 중에 Ctrl+z 를 쓰시면 됩니다.


'Web > Ubuntu' 카테고리의 다른 글

패키지 설치 방법  (0) 2010.05.06
Ubuntu 기본 메뉴얼  (0) 2010.05.06
server version에 gui 설치  (0) 2010.03.10
freenx 설치  (0) 2010.03.10
파일시스템에 대한 내용  (0) 2010.03.10
Posted by jazzlife
,

Ubuntu Server 에디션을 설치하게 되면, Desktop 에디션과 달리 GUI 환경이 기본적으로 설치되지 않는다.

검은 바탕에 글자들이 보이고, 커서가 깜빡깜빡한 상태로 보이게 된다.

이 상황하에서 GUI를 볼 수 있는 방법을 소개하고자 한다.

  • Ubnutu-9.04-server-i386
  • GUI를 설치하기 위해서는 “apt-get”명령을 사용해야 한다.
  • “apt-get” 명령은 네트워크를 이용하여 외부의 파일을 가져와서 설치하는 것이므로, 네트워크가 제대로 설치된 것인지 확인이 필요하다.
  • “ping” 명령을 통하여 네트워크 설정이 잘 되었는지 확인토록 한다.
  • 네트워크가 안 된다면, 아래의 네트워크 설정 부분을 참고하여 설정토록 한다.

빌드 서버라면, 아래와 같이 고정 IP 세팅을 해준다.

  • /etc/network/interfaces 파일 수정
    $ sudo vi /etc/network/interfaces
    auto eth0
    iface eth0 inet static
    address XXX.XXX.XXX.XXX (ip주소)
    netmask 255.255.255.0   (넷마스크)
    gateway XXX.XXX.XXX.XXX  (게이트웨이)
  • /etc/resolv.conf 파일 수정
    $ sudo vi /etc/resolv.conf
    nameserver 165.243.137.34   (1차 도메인 서버 주소)
    nameserver 165.243.137.23   (2차 도메인 서버 주소)
    $ sudo /etc/init.d/networking restart

Reference for This Setting

  • 우선 update가 필요하다. update하지 않으면, “apt-get” 명령이 제대로 작동하지 않기도 한다.
    $ sudo apt-get update
    $ sudo aptitude install -- no-install-recommends ubuntu-desktop
  • reboot을 하게 되면, GUI가 보이게 된다.
      $ sudo reboot
    

'Web > Ubuntu' 카테고리의 다른 글

Ubuntu 기본 메뉴얼  (0) 2010.05.06
백그라운 명령 수행  (0) 2010.04.14
freenx 설치  (0) 2010.03.10
파일시스템에 대한 내용  (0) 2010.03.10
리눅스 계정관리  (0) 2010.03.08
Posted by jazzlife
,

freenx 설치

Web/Ubuntu 2010. 3. 10. 15:14

다음 순서로 설치 후


# sudo dpkg -i nxclient_3.4.0-5_i386.deb
# sudo dpkg -i nxnode_3.4.0-11_i386.deb
# sudo dpkg -i nxserver_3.4.0-12_i386.deb


혹시 cups를 참조 할 수 없다는 메시지가 나오면

# sudo chmod 755 /usr/lib/cups/backend/ipp

입력

==========================================
[Ubuntu amd64 64bits]에서는 호환되는 서버를 사용해야한다.

Install Neatx  server on Ubuntu 10.04

sudo apt-get install python-software-properties && sudo add-apt-repository ppa:freenx-team

Then Update Apt

sudo apt-get update

At this point, the repository is added and apt is updated, then install the neatx-server package (using Aptitude to install extra needed packages).

sudo apt-get install neatx-server

'Web > Ubuntu' 카테고리의 다른 글

백그라운 명령 수행  (0) 2010.04.14
server version에 gui 설치  (0) 2010.03.10
파일시스템에 대한 내용  (0) 2010.03.10
리눅스 계정관리  (0) 2010.03.08
libstdc++-libc6.2-2.so.3 없을 때  (0) 2010.02.26
Posted by jazzlife
,

fsck    리눅스 파일 시스템을 점검하고 수리한다.

설명: fsck 은 리눅스 파일 시스템을 점거하고 필요에 따라 수리할 때 사용한다.

      파일 시스템은 장치명(예, /dev/hda1, /dev/sdb2)이거나 파일 시스템이 마운트 된

      마운드 포인트 (예, /, /usr, /home 등)이다. 서로 다른 물리적 드라이브 상의

      여러 파일 시스템을 점검하는 경우 병렬 처리가 가능한다. 병렬 처리를 사용하므로

      점검에 드는 시간을 절약할 수 있다.


옵션:           -f      무조건 검사
                -A      /etc/fstab에 등록된 내용을 참고하여 모든 디스크 검사

                -R      -A와 같이 사용될 때 루트 파일 시스템은 제외

                -N      실행하지는 않고 어떤 작업을 수행할지만 보여줌
                -a      에러가 있으면 물어봄 없이 자동으로 처리
                -b      수퍼블록에 손상이 있을 때.

                -r      파일 시스템 복구시 질문. 이 옵션은 단지 호환성 때문에 제공

mkfs   리눅스 파일 시스템 만들기

        mkfs -t <시스템유형> <파티션>
                -c      베드블록이 있는지 꼼꼼하게 검사
                -m <용량> root를 위한 예비공간을 용량만큼 남겨둔다.


        mke2fs <파티션>         ext2 파일시스템을 만든다.
        mke2fs /dev/hda7        hda7 파티션을 ext2파일시스템으로 만든다.

mount   마운트시키기
        mount 라고만 치면 현재 마운트됨 정보를 보여준다.
        mount /dev/fd0 /mnt/floppy              플로피 마운트
        mount /dev/cdrom /mnt/cdrom             시디롬 마운트
        mount /dev/hda5 /mnt/win                윈도파일시스템 마운트

unmount 마운트제거하기
        umount /dev/cdrom
        umount /mnt/cdrom

※umount 되지않을 때
        fuser -km /mnt/cdrom       /mnt/cdrom/ 이하에 있는 프로세서를 모두 죽인다.
        umount /mnt/cdrom

'Web > Ubuntu' 카테고리의 다른 글

server version에 gui 설치  (0) 2010.03.10
freenx 설치  (0) 2010.03.10
리눅스 계정관리  (0) 2010.03.08
libstdc++-libc6.2-2.so.3 없을 때  (0) 2010.02.26
deb, rpm, bin 설치  (0) 2010.02.26
Posted by jazzlife
,

▶ 일반사용자 슈퍼권한 할당 방법

1) root 권한으로 visudo명령을 이용하여 /etc/sudoers 파일을 열어본다.

아래는 design 이라는 일반계정을 root 권한으로 부여해 줘보자.

16 # User privilege specification
17 root    ALL=(ALL) ALL    # root 사용자에 대한 모든 권한
18 design  ALL=/sbin/shutdown,     /file_design/design # whell 그룹에 대한 루트 권한
19 %test   ALL=(ALL) ALL    # 일반 사용자에 대한 특정권한
위와 같이

2). sudo 명령어
형식 : $ sudo 명령어
$ sudo shutdown -r now
password :

▶ X-win 에서 사용자 계정 관리
1). system-config-users 실행
- Alt+F2 키를 눌러 실행 창에서 system-config-users 명령 입력


▶ 그룹 관리
1). 그룹생성
usage: groupadd [-g gid [-o]] [-r] [-f] group
[옵션]
-g : 그룹의 고유 ID
-o : 그룹의 고유 ID를 500이하의 값으로 지정하는 경우 사용
-r : 그룹의 ID를 500 이하의 값으로 자동 지정
-f : 강제로 그룹을 추가하는 옵션

ex)
# groupadd test
# groupadd -g 801 test2

2). 그룹 속성 변경
사용법: groupmod [-g gid(그룹 아이디) [-o]] [-n 이름] 그룹명
[옵션]
-g : 그룹의 고유 ID
-o : 그룹의 고유 ID를 500이하의 값으로 지정하는 경우 사용
-n : 변경될 그룹명

ex)
# groupmod -n test imsi
# groupmod -g 802 test

3). 그룹 삭제
ex)
# groupdel test

▶ 로그인 관리
[1]
1). 특정계정 로그인 허용 및 불허 정책(실행 레벨 2, 3번에서 사용)
/etc.pam.d/login 파일의 맨 윗줄 수정(추가)
auth       required /lib/security/pam_listfile.so item=user sense=allow file=/etc/loginuser onerr=succeed

2). /etc/loginuser 파일 생성 및 로그인 가능 계정 추가
이 파일안에 로그인 가능한 계정만 추가
# 반대인 경우 1). 번에서 sense=deny file 부분을 nologinuser로 한다음 2).번에서 nologinuser를 생성

->혹 사용자는 로그인 불허하는 방법으로 제일 쉬운 방법을 /etc/passwd 에서 그 계정에 해당하는 쉘종류를 /bin/bash 에서 /bin/false로 변경하는 거라고 한다.
-> 또한 잠깐동안 못쓰게 할려면 /etc/passwd 에서 그 계정의 두 번째 컬럼 부분의 x에 해당하는 부분은 * 로 잠깐 바꾸는 법이다.

- PAM에 의한 계정의 로그인 허용과 불허 방법은 콘솔, 텔넷, FTP, SSH에서 모두 적용 가능.
- X-win로 접속할 때는 적용 되지 않는다.

[2]
su - 명령 사용자 제한
1). /etc/pam.d/su 파일 수정
auth suuficent /lib/security/pam_rootok.so
auth requried  /lib/security/pam_wheel.so use_uid
이 두부분을 주석 제거 한다.

2). /etc/group 의 wheel그룹에 su 명령 사용가능한 계정추가
ex) wheel:x:10:root,계정명 이런식으로 수정한다.

% 추가로 로그 기록을 위한 debug옵션 추가를 한다.
auth required /lib/security/pam_wheel.so debug use_uid
%verify 하는 법
tail /var/log/messages


▶ 사용자 계정 바꾸기
# su -
-> root의 열쇠글 입력
# su test
-> test의 열쇠글 입력

"-" 이부분이 들어가게 되면 시스템 정보도 함께 갖고 오게됨,

▶ 계정 사용자 정보 변경
# su - (su 뒤에 - 또는 -l 붙이지 않으면 완전한 root권한을 얻지 못한다.)
-> 슈퍼유저(root)의 열쇠글 입력
# usermod -s /bin/tcsh test
# cat /etc/passwd | grep test

usage: usermod  [-u uid [-o]] [-g group] [[-a] -G group,...]
                [-d 홈 디렉토리 [-m]] [-s 쉘] [-c 적요사항] [-l 새_이름]
                [-f 비활성화] [-e 만기] [-p 패스워드] -L|-U] 이름

-c : 내용
-d : 홈디렉토리
-e : 만료일
-G : 그룹
-s : 기본 쉘
-u : UID
-l : 사용자 계정명 변경


▶ 계정 열쇠글 지정 및 변경
1) /etc/passwd 파일을 직접 열어서 열쇠글 변경(비추천)
2) 시스템 관리자에 의한 사용자 계정 열쇠글 변경
ex)
# useradd test
# passwd test
- test 사용자 비밀번호를 두 번 입력
3) 사용자가 직접 열쇠글 변경
$ passwd
- 자신의 현재 비밀번호를 입력한 후, 다시 자신의 비밀번호를 두 번 입력한다.

4) Shadow 열쇠글 시스템
# cat /etc/passwd | grep root
# pwunconv   # 열쇠글 필드에 x대신 열쇠글이 나타나도록 설정.
# cat /etc/passwd | grep root
# pwconv     # Shadow 열쇠글 시스템 적용.
# cat /etc/passwd | grep root
# pwunconv 상태에선 사용자 비밀번호 변경이 불가함.

5) /etc/shadow
1계정명:2열쇠글:3최정변경일:4변경취소일수:5변경유예기간:6변경경고일수:7사용불가날짜:8만료일:9예약

6) chage 를 이용한 계정 열쇠글 관리
사용법: chage [-l] [-m 최소일수] [-M 최대일수] [-W 경고일수]
        [-I 무효일수] [-E 만료일수] [-d 새 패스워드 변경일] 사용자명

# chage -M 15 -E 2009/03/25 test
# chage -l test

'Web > Ubuntu' 카테고리의 다른 글

freenx 설치  (0) 2010.03.10
파일시스템에 대한 내용  (0) 2010.03.10
libstdc++-libc6.2-2.so.3 없을 때  (0) 2010.02.26
deb, rpm, bin 설치  (0) 2010.02.26
리눅스 삼바 서버 - 리눅스 삼바 클라이언트 접속 방법  (0) 2010.02.09
Posted by jazzlife
,

우분투에서
realvncview(vnc-4_1_3-x86_linux.tar.gz)를 실행했을때
"libstdc++-libc6.2-2.so.3: cannot open shared object file: No such file or directory"
위의 에러가 뜨면

libstdc++2.10-glibc2.2/download
1. 위의 링크중에서 빠른 지역 서버를 눌러 libstdc++2.10-glibc2.2_2.95.4-24_i386.deb를 받는다.
2. sudo dpkg --force-architecture -i libstdc++2.10-glibc2.2_2.95.4-24_i386.deb
이명령어로 패키지를 설치한다.

apt에는 libstdc++2.10버전이 사라졌으며
cd /usr/lib
ln -s  libstdc++.so.지금버전  libstdc++-libc6.2-2.so.3

하면 라이브러리 호환성이 떨어질수도...

'Web > Ubuntu' 카테고리의 다른 글

파일시스템에 대한 내용  (0) 2010.03.10
리눅스 계정관리  (0) 2010.03.08
deb, rpm, bin 설치  (0) 2010.02.26
리눅스 삼바 서버 - 리눅스 삼바 클라이언트 접속 방법  (0) 2010.02.09
Samba install & Setting  (0) 2010.02.08
Posted by jazzlife
,

deb, rpm, bin 설치

Web/Ubuntu 2010. 2. 26. 12:12

1. deb

  • sudo dpkg -i **.deb

2. rpm

  • sudo alien -k --scripts 변환할파일.rpm
  • sudo dpkg -i **.deb

3. bin

  • sh 파일명


'Web > Ubuntu' 카테고리의 다른 글

리눅스 계정관리  (0) 2010.03.08
libstdc++-libc6.2-2.so.3 없을 때  (0) 2010.02.26
리눅스 삼바 서버 - 리눅스 삼바 클라이언트 접속 방법  (0) 2010.02.09
Samba install & Setting  (0) 2010.02.08
turn off beep sound  (0) 2010.02.08
Posted by jazzlife
,
두 가지 방법이 있답니다.

1. ftp처럼 직접 접속하여 사용하는 방법

# smbclient -L localhost -N
(localhost의 samba server 확인)
# smbclient //192.168.0.2/myshare
(192.168.0.2 samba server의 myshare에 접속)
# smbclient //192.168.0.2/myshare -U user01 ; user01로 접속시


2. mount하여... local에서 디스크처럼 사용하는 방법

# smbmount //192.168.0.2/myshare /mnt/samba -o username=user01
(user01의 계정으로 myshare라는 공유 디렉토리 mount)


3. umount

# smbumount /마운트경로

'Web > Ubuntu' 카테고리의 다른 글

libstdc++-libc6.2-2.so.3 없을 때  (0) 2010.02.26
deb, rpm, bin 설치  (0) 2010.02.26
Samba install & Setting  (0) 2010.02.08
turn off beep sound  (0) 2010.02.08
Ubuntu GUI Install  (0) 2010.02.08
Posted by jazzlife
,
파일공유 및 프린터 공유를 위해 samba를 설치하도록 한다.
$ sudo apt-get install samba smbfs

그룹 추가
$ sudo groupadd smbusers

그룹 확인
$ sudo cat etc/group

계정생성
$ sudo useradd -d /home/spnick -g smbusers -s /bin/bash -m -k /etc/skel spnick

생성한 계정에 패스워드 부여
$ sudo passwd spnick

삼바는 별도로 패스워드를 관리한다.
삼바용 패스워드를 설정해준다.
(윈도우에서 공유폴더에 접근이 편하게 하려면 윈도우 계정과 동일한 패스워드로 설정하는게 좋다)
$ sudo smbpasswd -a spnick

모든 계정이 접근 가능한 폴더를 생성해주자.
$ sudo mkdir /home/share

생성한 폴더의 그룹을 smbuser로 변경해준다.
$ sudo chgrp smbusers /home/share

권한은 1775로 준다. (sticky bit를 적용한다)
$ sudo chmod 1775 /home/share

sticky bit 를 사용하면 파일 또는 디렉토리를 지우는것은 그 파일 또는 디렉토리를 생성한 사람만 가능하게 된다.

적용후 확인해보면 다음과 같이 권한 끝이 t 로 되어 있다.
------------------------------------------------------------------------------
4 drwxrwxr-t  2 root   smbusers  4096 2008-12-31 21:34 share
------------------------------------------------------------------------------

samba 설정 파일을 편집 한다.
$ sudo vi /etc/samba/smb.conf

공유 디렉토리 접근시 계정과 패스워드를 입력받도록 하기 위해
security = user 부분을 찾아서 주석을 해제해준다.

각 계정의 자신의 홈 디렉토리가 공유되도록 해준다.
;[homes] 부분을 찾아서 주석을 해제해준다.

다음과 같이 세팅
------------------------------------------------------------------------------
[homes] # 리눅스 홈 디렉토리 접근 설정
   comment = Home Directory # 설명
   browseable = no # 공유 목록(homes)이 보이지 않게 한다. 홈디렉토리만 보인다.
   valid users = @smbusers # 접근 가능 유저 설정
   path = /home/%S # 홈 디렉토리 경로 지정
   read only= yes # 읽기 전용으로 설정
   write list = %S # 자신만 write 가능하도록 한다.
   create mask = 0644 # 생성 파일 디폴트 퍼미션
   directory mask = 0755 # 생성 디렉토리 디폴트 퍼미션
   hide dot files = yes # .으로 시작하는 파일이 안보이게 한다.
   veto files = /.?*/ # .으로 시작하는 파일 생성을 차단한다.
------------------------------------------------------------------------------

그룹내 모든 계정이 접근 가능한 디렉토리 설정
------------------------------------------------------------------------------
[share] # 접속시 보여지는 공유 폴더 이름
   comment = Share Directory # 설명
   browseable = yes # 공유 목록(share)이 보이게 한다.
   valid users = @smbusers # 접근 가능 유저 설정
   path = /home/share # 디렉토리 경로 지정
   read only = no # 쓰기 가능
   create mask = 0644 # 생성 파일 디폴트 퍼미션
   directory mask = 0755 # 생성 디렉토리 디폴트 퍼미션
------------------------------------------------------------------------------

프린터 공유는 기본적으로 세팅되어 있기 때문에
프린터 드라이버 설치만 끝나면 더이상 손대지 않아도 된다.
만약 윈도우즈에서 프린터 공유 완료후에
프린터 상태가 액세스 거부로 표시되거나
프린터 큐 확인이 안되는경우에는
[printers] 항목을 찾아서 다음 내용을 추가한다.
------------------------------------------------------------------------------
use client driver = yes
------------------------------------------------------------------------------

설정 저장후 설정이 제대로 되었는지 체크해본다.
$ sudo testparm

설정이 정상적으로 완료되었다면 samba 재시작.
$ sudo /etc/init.d/samba restart 


// public 공유 폴더를 만들자 //

#/etc/samba/smb.conf
[public]
        comment = Public Campusnet Shares
        browsable = yes
        path = /data/pub
        public = yes
        writable = no
        write list = dawuss
        guest ok = yes

[global]
        #...
        guest account = nobody
        map to guest = bad user


# smbpasswd -an nobody


2. 환경설정

[global]
# 삼바에서의 한글 입/출력
preserve case = yes
short preserve case = yes
dos charset = CP949
unix charset = CP949
display charset = CP949


# 윈도우 NetBios 이름 (네트워크 드라이브 연결시 이름)
server string = SAMBA-SERVER

# 삼바 방화벽 (xxx는 허용할 IP 대역 입력)
hosts allow = 127. 192.168. xxx.xxx.xxx.

3. 서비스 등록 및 시작
/sbin/service smb restart

/sbin/chkconfig --level 3 smb on

4. 삼바 사용자 및 패스워드 추가
smbpasswd -a 사용자계정 => 사용자의 삼바용 패스워드 추가
smbpasswd -x 사용자계정 => 사용자의 삼바 계정 삭제
smbpasswd -d 사용자계정 => 사용자의 삼바 계정을 사용중지

'Web > Ubuntu' 카테고리의 다른 글

deb, rpm, bin 설치  (0) 2010.02.26
리눅스 삼바 서버 - 리눅스 삼바 클라이언트 접속 방법  (0) 2010.02.09
turn off beep sound  (0) 2010.02.08
Ubuntu GUI Install  (0) 2010.02.08
Fastest Ubuntu Repository  (0) 2010.02.08
Posted by jazzlife
,

turn off beep sound

Web/Ubuntu 2010. 2. 8. 11:05
[.profile]

echo -ne '\033[11;0]'

'Web > Ubuntu' 카테고리의 다른 글

deb, rpm, bin 설치  (0) 2010.02.26
리눅스 삼바 서버 - 리눅스 삼바 클라이언트 접속 방법  (0) 2010.02.09
Samba install & Setting  (0) 2010.02.08
Ubuntu GUI Install  (0) 2010.02.08
Fastest Ubuntu Repository  (0) 2010.02.08
Posted by jazzlife
,

Ubuntu GUI Install

Web/Ubuntu 2010. 2. 8. 10:13

GUI Setting for Ubuntu Server Edition

Ubuntu Server 에디션을 설치하게 되면, Desktop 에디션과 달리 GUI 환경이 기본적으로 설치되지 않는다.

검은 바탕에 글자들이 보이고, 커서가 깜빡깜빡한 상태로 보이게 된다.

이 상황하에서 GUI를 볼 수 있는 방법을 소개하고자 한다.


Ubuntu Version

  • Ubnutu-9.04-server-i386
 

네트워크 설정 확인

  • GUI를 설치하기 위해서는 “apt-get”명령을 사용해야 한다.
  • “apt-get” 명령은 네트워크를 이용하여 외부의 파일을 가져와서 설치하는 것이므로, 네트워크가 제대로 설치된 것인지 확인이 필요하다.
  • “ping” 명령을 통하여 네트워크 설정이 잘 되었는지 확인토록 한다.
  • 네트워크가 안 된다면, 아래의 네트워크 설정 부분을 참고하여 설정토록 한다.
 

네트워크 설정

빌드 서버라면, 아래와 같이 고정 IP 세팅을 해준다.


IP 주소 입력

  • /etc/network/interfaces 파일 수정
    $ sudo vi /etc/network/interfaces
    auto eth0
    iface eth0 inet static
    address XXX.XXX.XXX.XXX (ip주소)
    netmask 255.255.255.0   (넷마스크)
    gateway XXX.XXX.XXX.XXX  (게이트웨이)
 

DNS 설정

  • /etc/resolv.conf 파일 수정
    $ sudo vi /etc/resolv.conf
    nameserver 165.243.137.34   (1차 도메인 서버 주소)
    nameserver 165.243.137.23   (2차 도메인 서버 주소)
 

네트워크 설정 적용

    $ sudo /etc/init.d/networking restart

Reference for This Setting


GUI 설치

  • 우선 update가 필요하다. update하지 않으면, “apt-get” 명령이 제대로 작동하지 않기도 한다.
    $ sudo apt-get update
    $ sudo aptitude install -- no-install-recommends ubuntu-desktop
  • reboot을 하게 되면, GUI가 보이게 된다.
      $ sudo reboot
    

'Web > Ubuntu' 카테고리의 다른 글

deb, rpm, bin 설치  (0) 2010.02.26
리눅스 삼바 서버 - 리눅스 삼바 클라이언트 접속 방법  (0) 2010.02.09
Samba install & Setting  (0) 2010.02.08
turn off beep sound  (0) 2010.02.08
Fastest Ubuntu Repository  (0) 2010.02.08
Posted by jazzlife
,